Frequently Asked Questions
There are a number of possible causes for such a behavior. This FAQ will help you to find out what is causing the problem in your specific situation. In this FAQ we will be using destination device as a generic term for the device you are trying to connect to. The destination device can be anything from a normal computer, to a server, to a network printer.
1. Are you trying to connect to the destination device using a host name?
If you are using a host name, please try once using its IP address instead. If that works, the problem has to do with DNS resolution. Please make sure DNS is enabled for the VPN connection and correctly configured. Note that using Bonjour or NETBIOS hostnames is generally not possible over VPN.
2. Is the IP address you are connecting to really part of the remote network?
For example, if your remote network is 192.168.13.0/24, you should be able to connect to IPs starting with 192.168.13.x, but connections to IPs starting with 192.168.14.x will not work as they are outside the address range of traffic tunneled through the VPN.
3. Is the local address in VPN Tracker part of the remote network?
Using a local address in VPN Tracker (Basic > Local Address) that is part of the remote network is not possible with most VPN gateways. Please use a local address that is outside all remote networks. For example, if your remote network is 192.168.13.0/24, do not use an address starting with 192.168.13. If you are using an automatic configuration method (e.g. Mode Config, EasyVPN, DHCP over VPN) you may be able to assign a local address to VPN Tracker that is part of the remote network. Refer to the configuration guide for your VPN gateway for more information.
4. Could multiple VPN users use the same local address?
If multiple VPN users exist, pleas make sure no two users are using the same local address (Basic > Local Address), otherwise one of them will not be able to use the tunnel anymore whenever both of them are connected. If that field is empty in your configuration, VPN Tracker will just use the IP address of your primary network interface as local address, and of course, this can also cause an address conflict with another user, that’s why we do not recommend to leave that field empty if there are multiple VPN users.
5. Can you ping the LAN address of the VPN gateway?
You can find a ping tool directly in VPN Tracker under Tools > Ping Host. The LAN address of the VPN gateway is special in the regard that this address doesn’t need to be routed at all. So if you can ping that address but no other remote address, it is most likely a routing issue at the remote end.
6. If you can't ping anything, try re-running the VPN Availability Test
The VPN Availability Test can be found in the menu: Tools > VPN Availability Test. Then try connecting the VPN again. The results of this test depend on the capabilities of your local Internet router/modem or the Internet connection itself and they influence how the VPN tunnel is established. VPN Tracker automatically runs the test for every new Internet connection it is able to detect but even if a connection has been tested before, there are various reasons why the behavior of that connection may have changed in the meantime.
7. Is your VPN gateway the default gateway (router) of its network?
If the VPN gateway is not the default gateway, you will in many cases need a suitable routing setup in order for responses to reach you. Whenever a device doesn’t know how to reach an IP address directly, it forwards its reply to its default gateway and if that isn’t the VPN gateway, it won’t know what to do with that reply data. In that case its important to configure the default gateway to forward replies to VPN users to the VPN gateway.
8. Is your VPN gateway the default gateway (router) of its network?
For more details, we would like to direct you to the following FAQ entry.
These messages can be ignored, or, if you have the option, you can disable the NetBIOS daemon that is sending out these packets on the Mac using the following command:
launchctl unload -w /System/Library/LaunchDaemons/com.apple.netbiosd.plistPlease note that disabling the NetBIOS daemon may affect your network file shares.
Configuring the Pre-Shared Key for a new VPN connection
VPN Tracker provides setup guides for all major gateway manufacturers. In these setup guides, you will also find information on how to set up a secure Pre-Shared Key for your specific device.
You can access all guides on this page.
I have lost my Pre-Shared Key - how can I get it back?
Here are a few tips for you to try and restore your Pre-Shared Key:
- Check if you have stored the affected connection in your Personal Safe. If so, you may be able to download the connection again.
- Check the Keychain (Applications > Utilities > Keychain Access). The Pre-Shared Key is usually saved here. Enter "Shared Secret" into the search bar to view a list of all your saved PSKs.
- Are you using Time Machine Backup? You could try restoring an older connection with the Pre-Shared-Key.
- Check your firewall or ask the relevant VPN Administrator. Refer to your device handbook to find out where to obtain this information on your specific firewall.
- If you haven't already, you can download VPN Tracker using this link.
- After the download has completed, launch the app and click the "Login" button in the top left-hand corner of the app home page.
- Enter your equinux ID and password in the space provided. Hint: This is the login you first created when purchasing VPN Tracker in our online store.
Are you a World Connect User?
You will need to download VPN tracker World Connect. You can do so using this link. VPN Tracker World Connect must be installed using the App Store. Once you've installed the app on your device, sign in with your equinux ID and password.
- Private IP Addresses, and
- Public IP Addresses
Private IP addresses can be used by any person or organisation for their private network.
The two most commonly used private network ranges (range of IP Addresses) are:
- 192.168.0.x, and
- 192.168.1.x
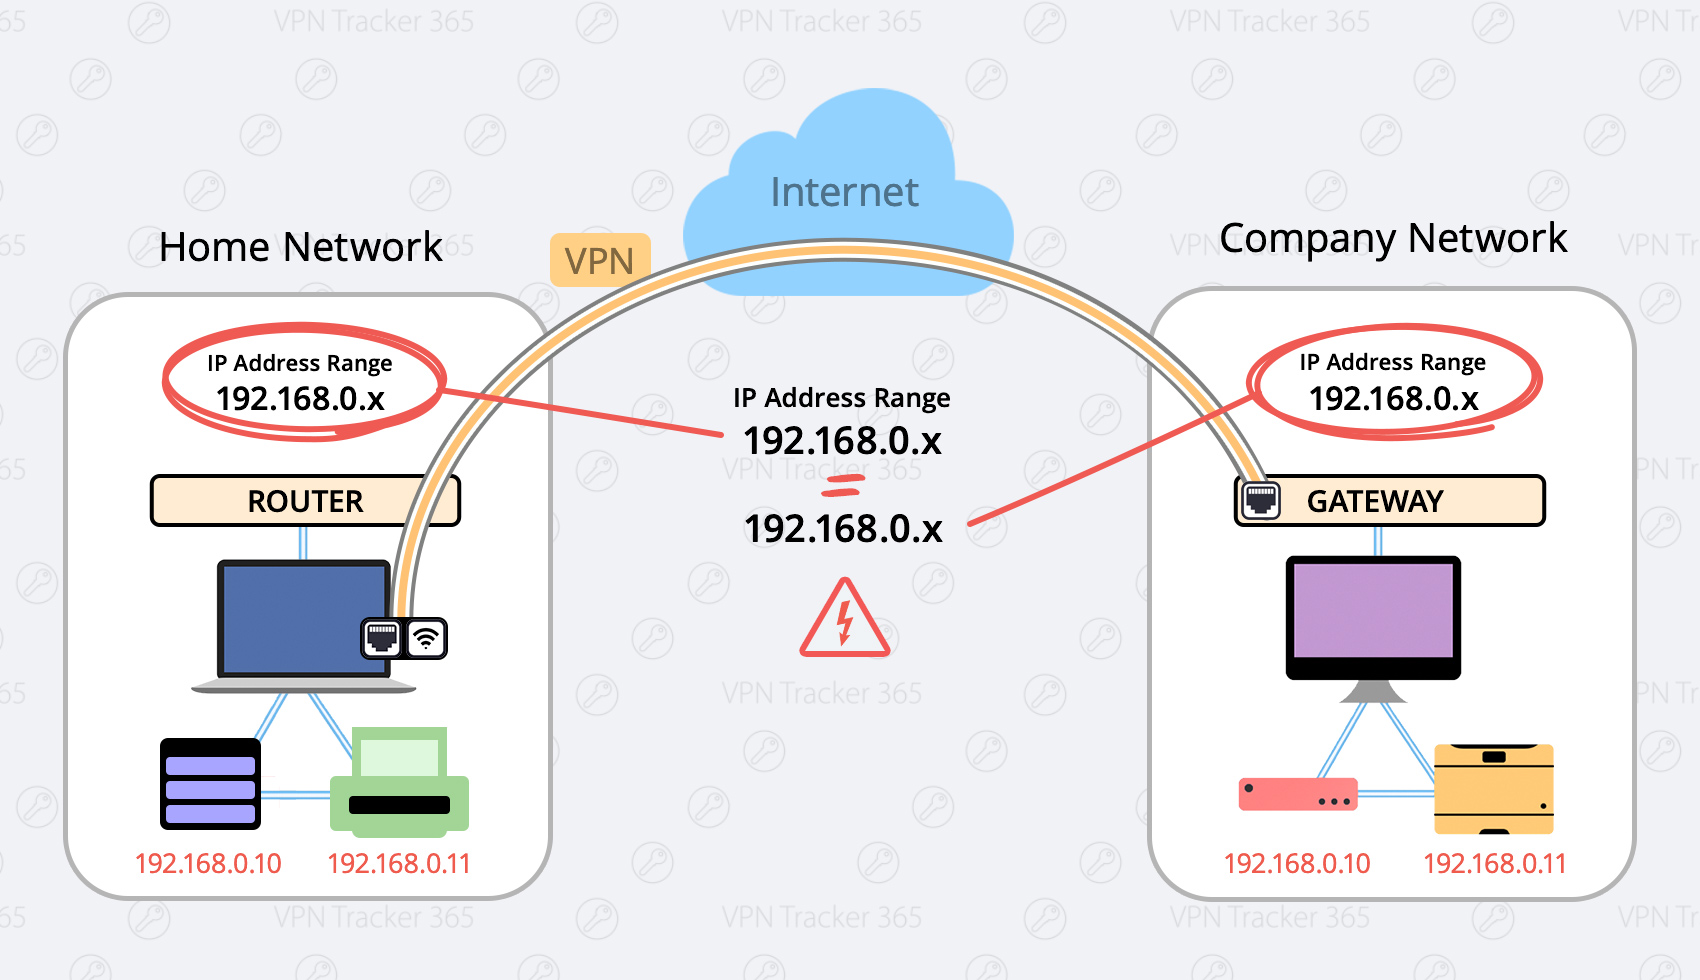
When for example your home network and your company network both use the same Private IP Range, there will be problems because you will see multiple devices with the same IP Adress and your computer will get confused.
Your Company Network:
When setting up a company network, most companies try to avoid the above listed IP ranges, which is also recommended by us, in order to not cause conflicts with people connecting over VPN. However, there are still some companies that use one of these popular network ranges.
Your Home Network:
A lot of popular home routers like Netgear, Asus, Google, D-Link, TP-Link, Linksys, Trendnet, AVM all use an IP Range of 192.168.0.x.
If your company Network uses the same IP Range as your home network you are going to run into problems.
Here are two possible solutions:
Change your local network to a different range (Preferred)
Possible Ranges are:
- 10.250.250.x
- 172.30.30.x
- 192.168.250.x
Advantage: Once you have made this change on your home network, you will never have conflicts in this network.
Disadvantage: You will need to change the settings on your private network router once, this requires access and can take some time.
What to do:
- Login to your home router
- Find the setup section with “DHCP” settings.
- Change your router to a different IP adress (for example an address from one of the ranges listed above, for example 172.30.30.1)
- Change the DHCP Server Settings to the same range of your router (If your router IP is 172.30.30.1, your range could be 172.30.30.10 to 172.30.30.253)
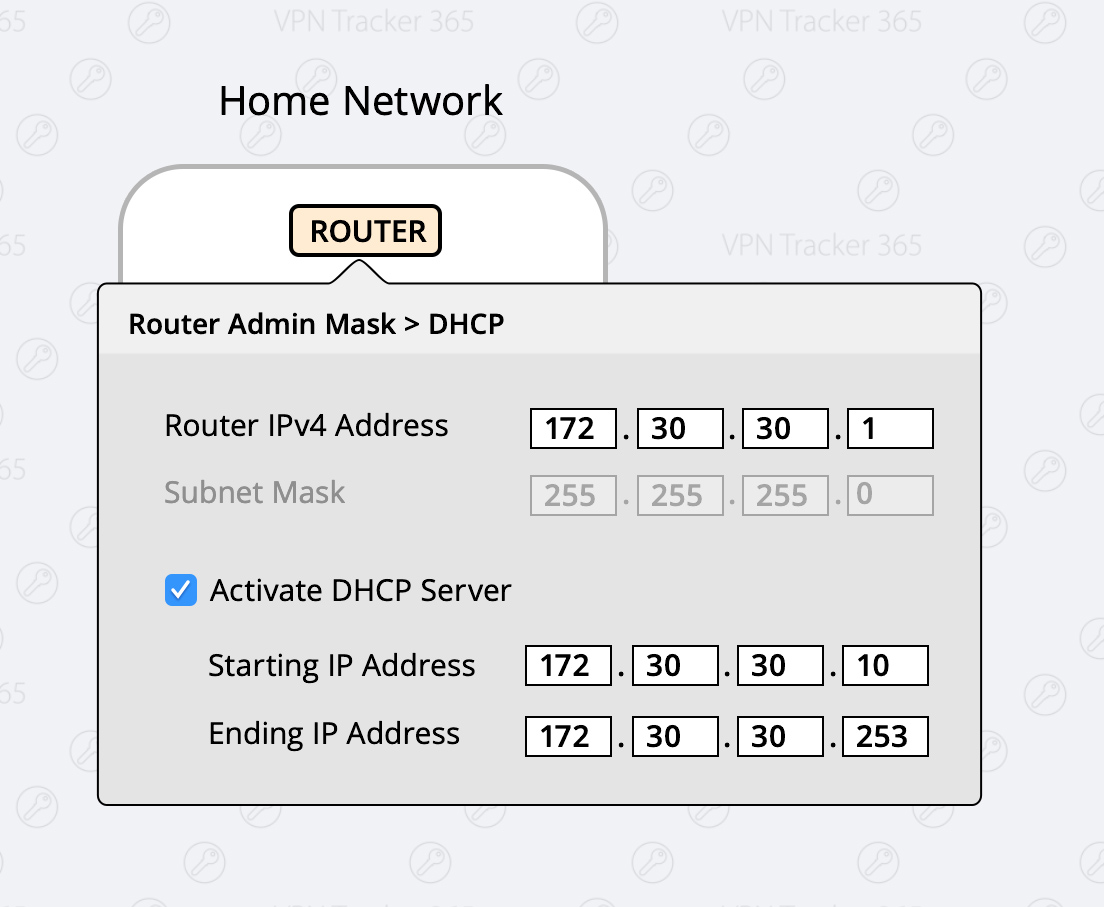
After you have made these changes, there will be no more conflicts between your home and company network.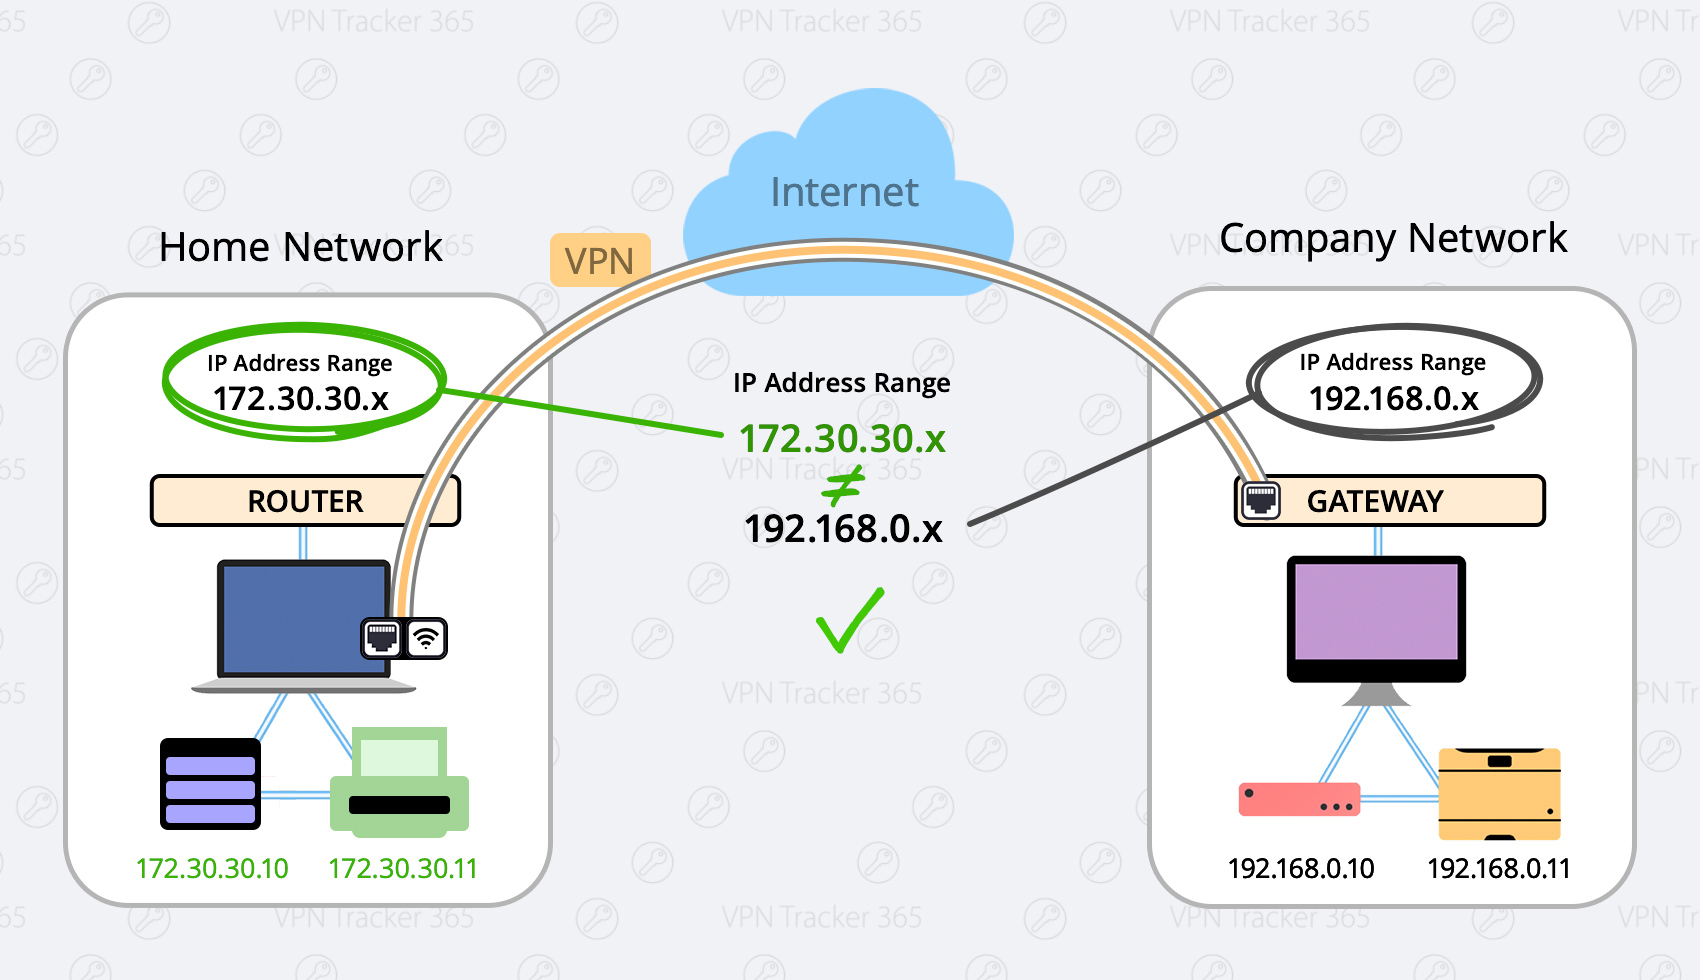
Force Traffic over VPN
There may be situations where it's not possible to use the first option (for example if you're in a coffee shop or hotel) In this case you have the option to force the traffic over your VPN Network, this means your VPN Network (company network) will always win.
Advantage: This setting is global, meaning no matter what network you are in you will always be able to connect.
Disadvantage: Once you are connected to your company’s VPN, you can not access local service, like home router, local storages or printers.
What to do:
- Configure your VPN Tracker connection
- Select the "Advanced" Tab at the top
- In the "Traffic control" section, activate the Checkbox "Force traffic over the VPN if remote networks conflict with local networks"

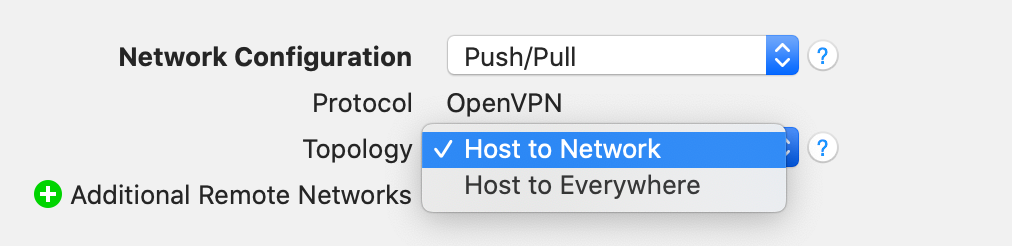
Such a setup is called “Host to Everywhere” in VPN Tracker. All non-local traffic will be sent through the VPN. For this setup to work, it must be properly configured in VPN Tracker and on the VPN gateway:
- The Network Topology must be set to “Host to Everywhere” in VPN Tracker
- The VPN gateway must accept an incoming VPN connection with a 0.0.0.0/0 (= everywhere) endpoint
Once these are configured, it should already be possible to establish the VPN connection. However, it is very likely that Internet access will not yet work. For Internet access to work, several more things need to be configured on the VPN gateway:
- The VPN gateway must route VPN traffic not destined for its local networks out on the Internet
- This traffic must be subject to Network Address Translation (NAT) in order for replies to reach the VPN gateway
- In many cases, a suitable remote DNS setup is necessary for DNS resolution to continue to work
Note that not alll VPN gateways can be configured for Host to Everywhere connections. Most devices designed for small office or home networks (e.g. devices by NETGEAR or Linksys) are not capable of dealing with Host to Everywhere connections.
VPN Tracker may prompt you for different passwords depending on the action you're performing. This guide explains what each prompt means and which password you should enter.
1. Your Mac Password
When is it needed?
– Installing VPN Tracker
– Approving system extensions
Why?
macOS requires your administrator password to authorize changes on your system.
Where do I find it?
This is your local Mac password – the one you use to log in when your Mac starts up.
2. Your equinux ID (VPN Tracker Account)
When is it needed?
– Logging into the VPN Tracker app (Mac or iOS)
– Accessing your account at my.vpntracker.com
Why?
This is your personal VPN Tracker account, giving you access to your plan, team, connections, and device settings.
Where do I find it?
This password is usually saved in your Keychain or Passwords app under “id.equinux.com”.
3. Pre-Shared Key (PSK) / Shared Secret
When is it needed?
– When setting up or connecting to a VPN connection
Why?
Some VPNs use a PSK to authenticate users. This key must match what’s configured on the VPN gateway.
Tip for Teams: Admins can share pre-configured VPN connections via TeamCloud to avoid PSK confusion.
Where do I find it?
This is usually set by your company’s VPN admin and stored in the connection. You typically don’t need to know it yourself.
4. Your Company Login (XAUTH Credentials)
When is it needed?
– When connecting to a company VPN
Why?
You may need to enter your company login (often the same credentials you use at work) to authenticate with the VPN.
Where do I find it?
You should have received it from your IT team — and hopefully not written it on a Post-it under your keyboard.
VPN Tracker automatically stores a backup of all your VPN connections on your Mac. If you have inadvertently deleted a connection, or wish to revert to an earlier copy of a connection, you can manually restore the backup copy.
Restore from your Backup
- Open Finder and choose "Go" > "Go to Folder…" from the menu bar
- Enter this path and press Return:
/Library/Application Support/VPN Tracker 365 - Rename your "etc" folder to "etc-backup" – for safekeeping
- Go into the "backup" folder
Here you'll see a number of backup folders, all organized and named by date.
- Move the "etc-date" folder you want to restore up one level into the main "VPN Tracker 365" folder
- Rename the folder your just moved to just "etc" (deleting the date)
- Open VPN Tracker 365
All of your connections will now be restored to their backed-up state.
A VPN connection typically runs over the Internet and the Internet has quite different network characteristics than a company or home network. Local networks typically offer a high amount of symmetric (upload equals download) bandwidth, very low and stable latency, very litte packet loss, almost no data corruption and a rather high and always constant maximum transmission unit size (MTU). Contrary to that, Internet connections offer a lot less bandwidth, usually asymmetric (much more download than upload) and the Internet has a rather high, very fluctuating latency, typically at leas some packet loss, data corruption can happen as well and the maximum transmission unit size can be much lower and is subject to change at any time even during an active transmission. Some of the protocols above can cope better with these conditions than others.
Issues to expect: Slow to very slow directory browsing (because of the large latency), copying a file from remote is slow (limited by the upload of the other side), copying a file to remote is slow (limited by the upload of the local side), directly opening a file directly is even slower (caused by limited upload bandwidth but also large latency and small packet sizes can play a role), and file access failures are possible (caused by packet loss and/or data corruptions). Please note that none of these is the fault of the VPN itself, even when running these protocols over the same Internet line without any VPN, the results would only be marginally better or not better at all.
Unfortunately there is little that can be done about these problems. There is nothing users can do to improve latency. Improving upload bandwidth will always help if such an option does exist as if bandwidth is the problem, it's almost always upload and not download bandwidth. Switching the protocol may help, as especially SMB/CIFS doesn't work very well over Internet lines with bigger latency and if it has to fall back to an older protocol version (one older than SMB 3.0), it will be a catastrophe (up to not working at all anymore). A problem is that SMB and WebDAV are the only protocols that Windows supports natively, whereas macOS supports all the protocols named above natively, thus it's required to resort to third party products to teach Windows alternative protocols. In a pinch one can try to use WebDAV, but WebDAV has a rather poor performance even when used in local networks. Dedicated NAS devices usually support NFS when enabled, which could yield a better performance than SMB.
IPsec VPN uses a different protocol (ESP) for the actual data transfer than for establishing the connection (IKE). Since the ESP protocol does not use network ports, NAT (Network Address Translation) routers may have difficulties handling it correctly. Only NAT routers that support "IPSec Passthrough" (sometimes also named "VPN Passthrough" or "ESP Passtrhough") and where this option is also enabled, can handle ESP data packets.
To work around this problem, two alternative tunneling methods exist:
- NAT-Traversal (old, RFC draft version)
- NAT-Traversal (new, RFC standard version)
Which of these methods will work with your connection depends on two properties:
- Which of these methods allows traffic to pass through your local Internet router.
- Which of these methods are supported by your VPN remote gateway.
To test for the first property, VPN Tracker will automatically establish three VPN test connections to a VPN gateway hosted by us whenever it detects a new router that has not been tested before. One connection uses plain ESP, the other two either NAT-T method mentioned above. It will remember the test results for this router and take them into account whenever you start a connection from the network location. The reason we are testing with our own gateway is simply that the test requires a gateway supporting all three methods, with a known configuration and a simply way to verify if traffic did arrive at that gateway.
The second property is not tested in advance, VPN Tracker will become aware of that information when it actually tries to connect to your VPN gateway. VPN Tracker will compare the methods your gateway supports with the stored test results. If there is a match, a method that your gateway supports and that was also working during the test, this method will be used. If there is no match, VPN Tracker will immediately stop and show an appropriate error in the log, explaining the situation.
If you suspect a NAT-Traversal issue or you think the previous test results may be wrong or outdated, simply re-run the test:
‣ Make sure NAT-Traversal (Advanced tab) is set to Automatic
‣ Go to "Tools" > "Test VPN Availability"
‣ Click "Test Again"
‣ Wait until the test has completed, then connect to your VPN
The test dialog also allows you to tell VPN Tracker to not test the current location and forget any previously created test results. This is rarely needed and also not recommended but there might be situation where the test results are wrong because access to our VPN gateway is not possible (e.g. it is blocked) and thus the test result are just bogus and say nothing about the true capabilities of your VPN gateway.
- Start your VPN connection in VPN Tracker
- Go to the Finder > Go To >Connect to Server
- In the Server Address field, enter the name or IP address of the server you want to connect to
- Click on the Connect button.
Create a VPN Shortcut:
VPN Tracker offers convenient shortcut options for frequently used connections. You only have to set up the shortcut once. Afterwards you will be able to connect to your VPN and open your files with just one button click.
Find out more:
Here's the fix:
- Download VPN Tracker for Mac or iPhone
- Copy your VPN connection details from the AnyConnect app
- Connect and enter your username and password when asked
That's it! VPN Tracker will store your login details securely via end-to-end encryption so you can get connected faster – for the best VPN experience on Mac and iOS.
Setting up VPN on your Mac
VPN Tracker is the leading VPN client for macOS and works seamlessly on all the latest macOS operating systems.You can download and test VPN Tracker here free.
Launching VPN Tracker for Mac
The first time you launch VPN Tracker on your Mac, you may need to grant it permission to create VPN connections for you.First please make sure VPN Tracker is in your Applications folder and complete these steps locally on the Mac (e.g. not over Screen Sharing, Remote Desktop or other remote access tool).
IMPORTANT: macOS notices when you run remote desktop systems like TeamViewer, Apple Remote Desktop, VNC or similar. and hides these buttons. You MUST be local to the Mac.
Then do this:
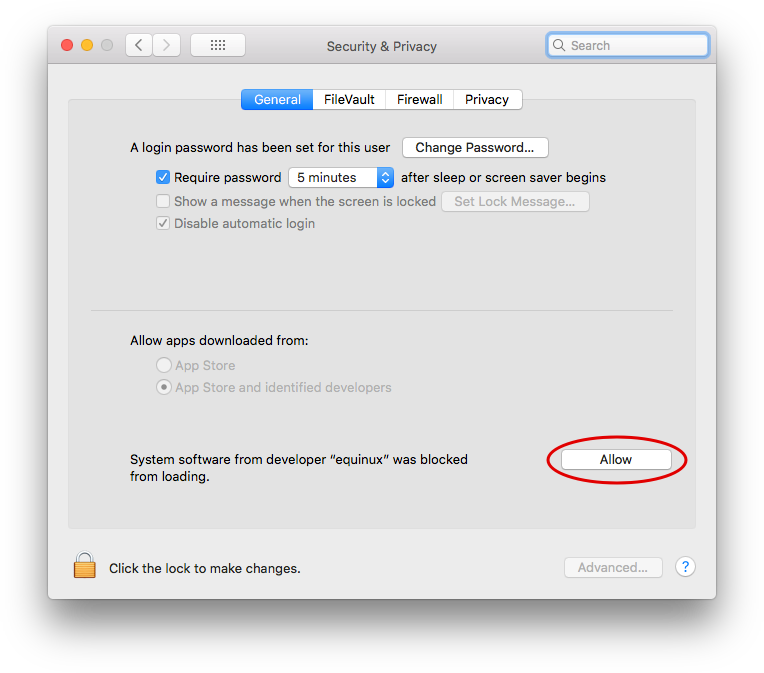
‣Open System PreferencesNow you'll be able to set up VPN Tracker.
‣Go to Security
‣Click "Allow"
Troubleshooting VPN Setup on macOS
If the "Allow" button can not be clicked, please make sure you are not using a 3rd party mouse or tablet input device, as these can look like remote desktop software to your Mac. If you are using e.g. a Wacom input tablet or mouse utility tool, try disabling those, reboot your Mac and then try clicking the button again.In case the button doesn't even appear in the dialog, please note that if your Mac has a MDM profile installed, the MDM profile can forbid users to approve their own System Extensions. In that case the profile itself has to approve our extension. Please see technical notes below.
Technical note for Enterprise Rollouts:
VPN Tracker for Mac uses a System Extension to create a secure VPN tunnel and manage network traffic. macOS High Sierra and newer macOS versions now require users to manually approve all System Extensions. For Enterprise rollouts via MDM, you can also pre-approve the VPN Tracker Kernel Extension using a special profile. Our Team IDs are CPXNXN488S and MJMRT6WJ8S.
Please see Apple's Support Document for more details.
Not using an MDM managed Mac?
If your Mac is not MDM managed, please try rebooting, as macOS occasionally can get tripped up with System Extensions. After the reboot, VPN Tracker should work fine.
Hash Mismatch usually means that the Pre-Shared Key (PSK) being used is wrong. When you get the "Hash Mismatch" error, the Hash algorithm is being rejected. However, this is not due to choosing an incorrect "Hashing" algorithm for Phase 1. If the Hashing algorithm chosen is actually wrong, then you would receive an error that would say "No Proposal Chosen" rather than a "Hash Mismatch" error. This would suggest that the client and gateway could not agree on common crypto settings. On the other hand, Hash Mismatch actually means that the hash your gateway calculated doesn't match the hash that VPN Tracker calculated (the two hashes are simply not matching). This hash is calculated out of values exchanged between the client and the gateway and the Pre-Shared Key. As all other values have just been exchanged and have been verified by both sides to be correct (so these cannot cause a different hash, not unless either side has a terrible bug). The only value that isn't exchanged and cannot be checked in advanced is the Pre-Shared Key (PSK).
After upgrading to macOS 15 Sequoia, you might notice that your Mac constantly changes its MAC address, affecting your ability to connect to your VPN. This behavior is due to macOS 15’s new privacy features, which can assign randomized MAC addresses for network connections. However, you can configure your network settings to always use a fixed MAC address, which can resolve issues with VPN connectivity, such as DHCP reservations failing due to MAC address changes.
How to Set a Fixed MAC Address in macOS 15 (Sequoia):
-
Open System Settings:
- Click the Apple logo in the top-left corner of your screen.
- Select System Settings from the dropdown menu.
-
Go to Wi-Fi Settings:
- In the left sidebar, click Wi-Fi.
- Select the Wi-Fi network you usually connect to for VPN access and click on "Details...".
-
Configure the MAC Address:
- Look for the option labeled Private Wi-Fi Address.
- Change this option to "Fixed" to use a fixed MAC address instead of a randomized one.
In some cases, the Fixed Setting may still cause issues. If this is the case, change the setting to "Off"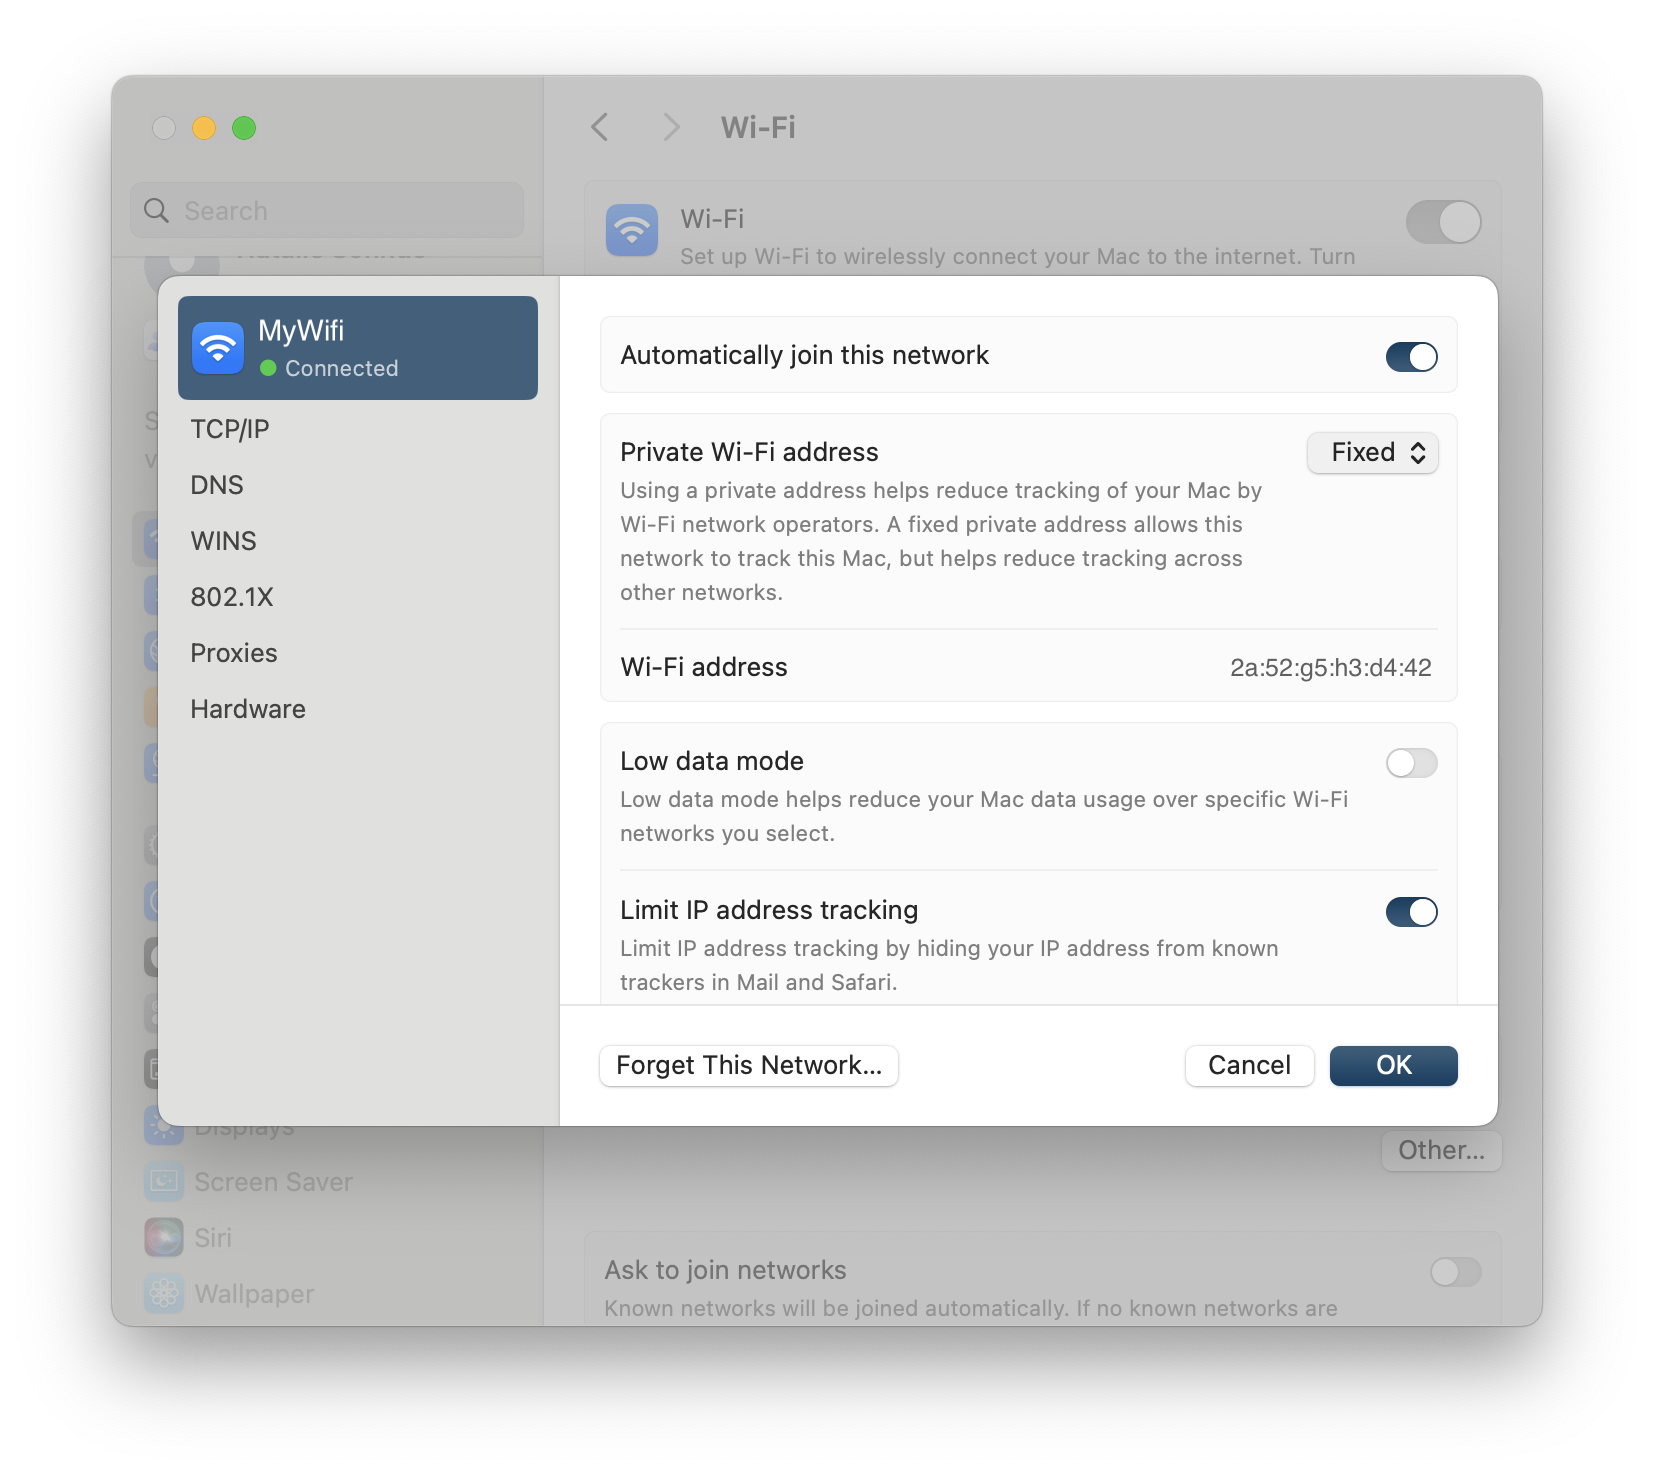
- Your network will now always connect using the same MAC address, helping maintain your VPN connection stability.
-
Re-establish VPN Tracker Connection:
- Once you've set a fixed MAC address, ensure that your VPN’s DHCP reservation or configuration aligns with this MAC address.
This process will restore the VPN Tracker’s ability to connect reliably using a consistent MAC address, resolving issues caused by macOS 15 Sequoia’s default MAC address randomization feature.
By default, traffic to the remote network cannot be sent through the VPN tunnel if it is using the same network as the local network.
Resolving a Network Conflict using Traffic Control
You can use Traffic Control and VPN Tracker will send non-essential local network traffic over the VPN.
Activate Traffic Control:
> Go to Advanced > Traffic Control
> Check "Force traffic over the VPN if remote networks conflict with local networks"
Note that you will never be able to reach the following addresses over VPN: The IP address of your local router, your DHCP server, and your DNS server(s). If you need to reach those IPs over VPN, you will have to resolve the network conflict instead of using Traffic Control. The same applies for any IPs that you need to reach locally and over VPN.
Resolving a Network Conflict Manually
You have two basic options for resolving a conflict:
- Change the local network to use a different network address. In most situations, this will entail changing the LAN settings on the local router (including DHCP settings if DHCP is used).
- Change the remote network to use a different network address. With most setups, this entails changing the LAN on the VPN gateway (including DHCP settings if DHCP is used), and changing the IPs used by devices on the VPN gateway's LAN (or triggering a DHCP refresh, if DHCP is used). If the LAN is used in the VPN settings (such as for policies or firewall rules), these will need to be changed as well. Finally, change the remote network in VPN Tracker to match the new settings
If you decide to change the remote network, it makes sense to choose a private network that less commonly used. According to our informal statistics, conflicts are least likely using these networks:
- Subnets of 172.16.0.0/12
- Subnets of 192.168.0.0/16, excluding 192.168.0.0/24, 192.168.1.0/24 and 192.168.168.0/24
If these are not an option, use a subnet of 10.0.0.0/8, excluding 10.0.0.0/24, 10.0.1.0/24, 10.1.0.0/24, 10.1.1.0/24. However, since wireless network operators sometimes choose to use the entire 10.0.0.0/8 network, the first two options are preferred.
If you have a more sophisticated VPN gateway, in particular a SonicWALL, you may be able to set up an alternative remote network on the VPN gateway that is mapped 1:1 through Network Address Translation (NAT) onto the actual network. Users can then connect to this network instead if they have a conflict of networks. We have a guide available that describes this approach for SonicWALL devices.
If the conflict is caused by virtual network interfaces (e.g. Parallels, VMware), see here for more information.
The recommendation of the OpenVPN developers is to best not use this option at all anymore. It is better toeither activate compression ("comp-lzo yes"), or to not use any compression at all (in this case the option "comp-lzo" should not even appearin the configuration).
The Optiome "comp-lzo no" doesn't mean "no compression", it means "compression only if the server requests it." Because of this the "comp-lzo" option is being replaced by the new option "compress", which partially shows a different behavior and thus is not backward compatible.
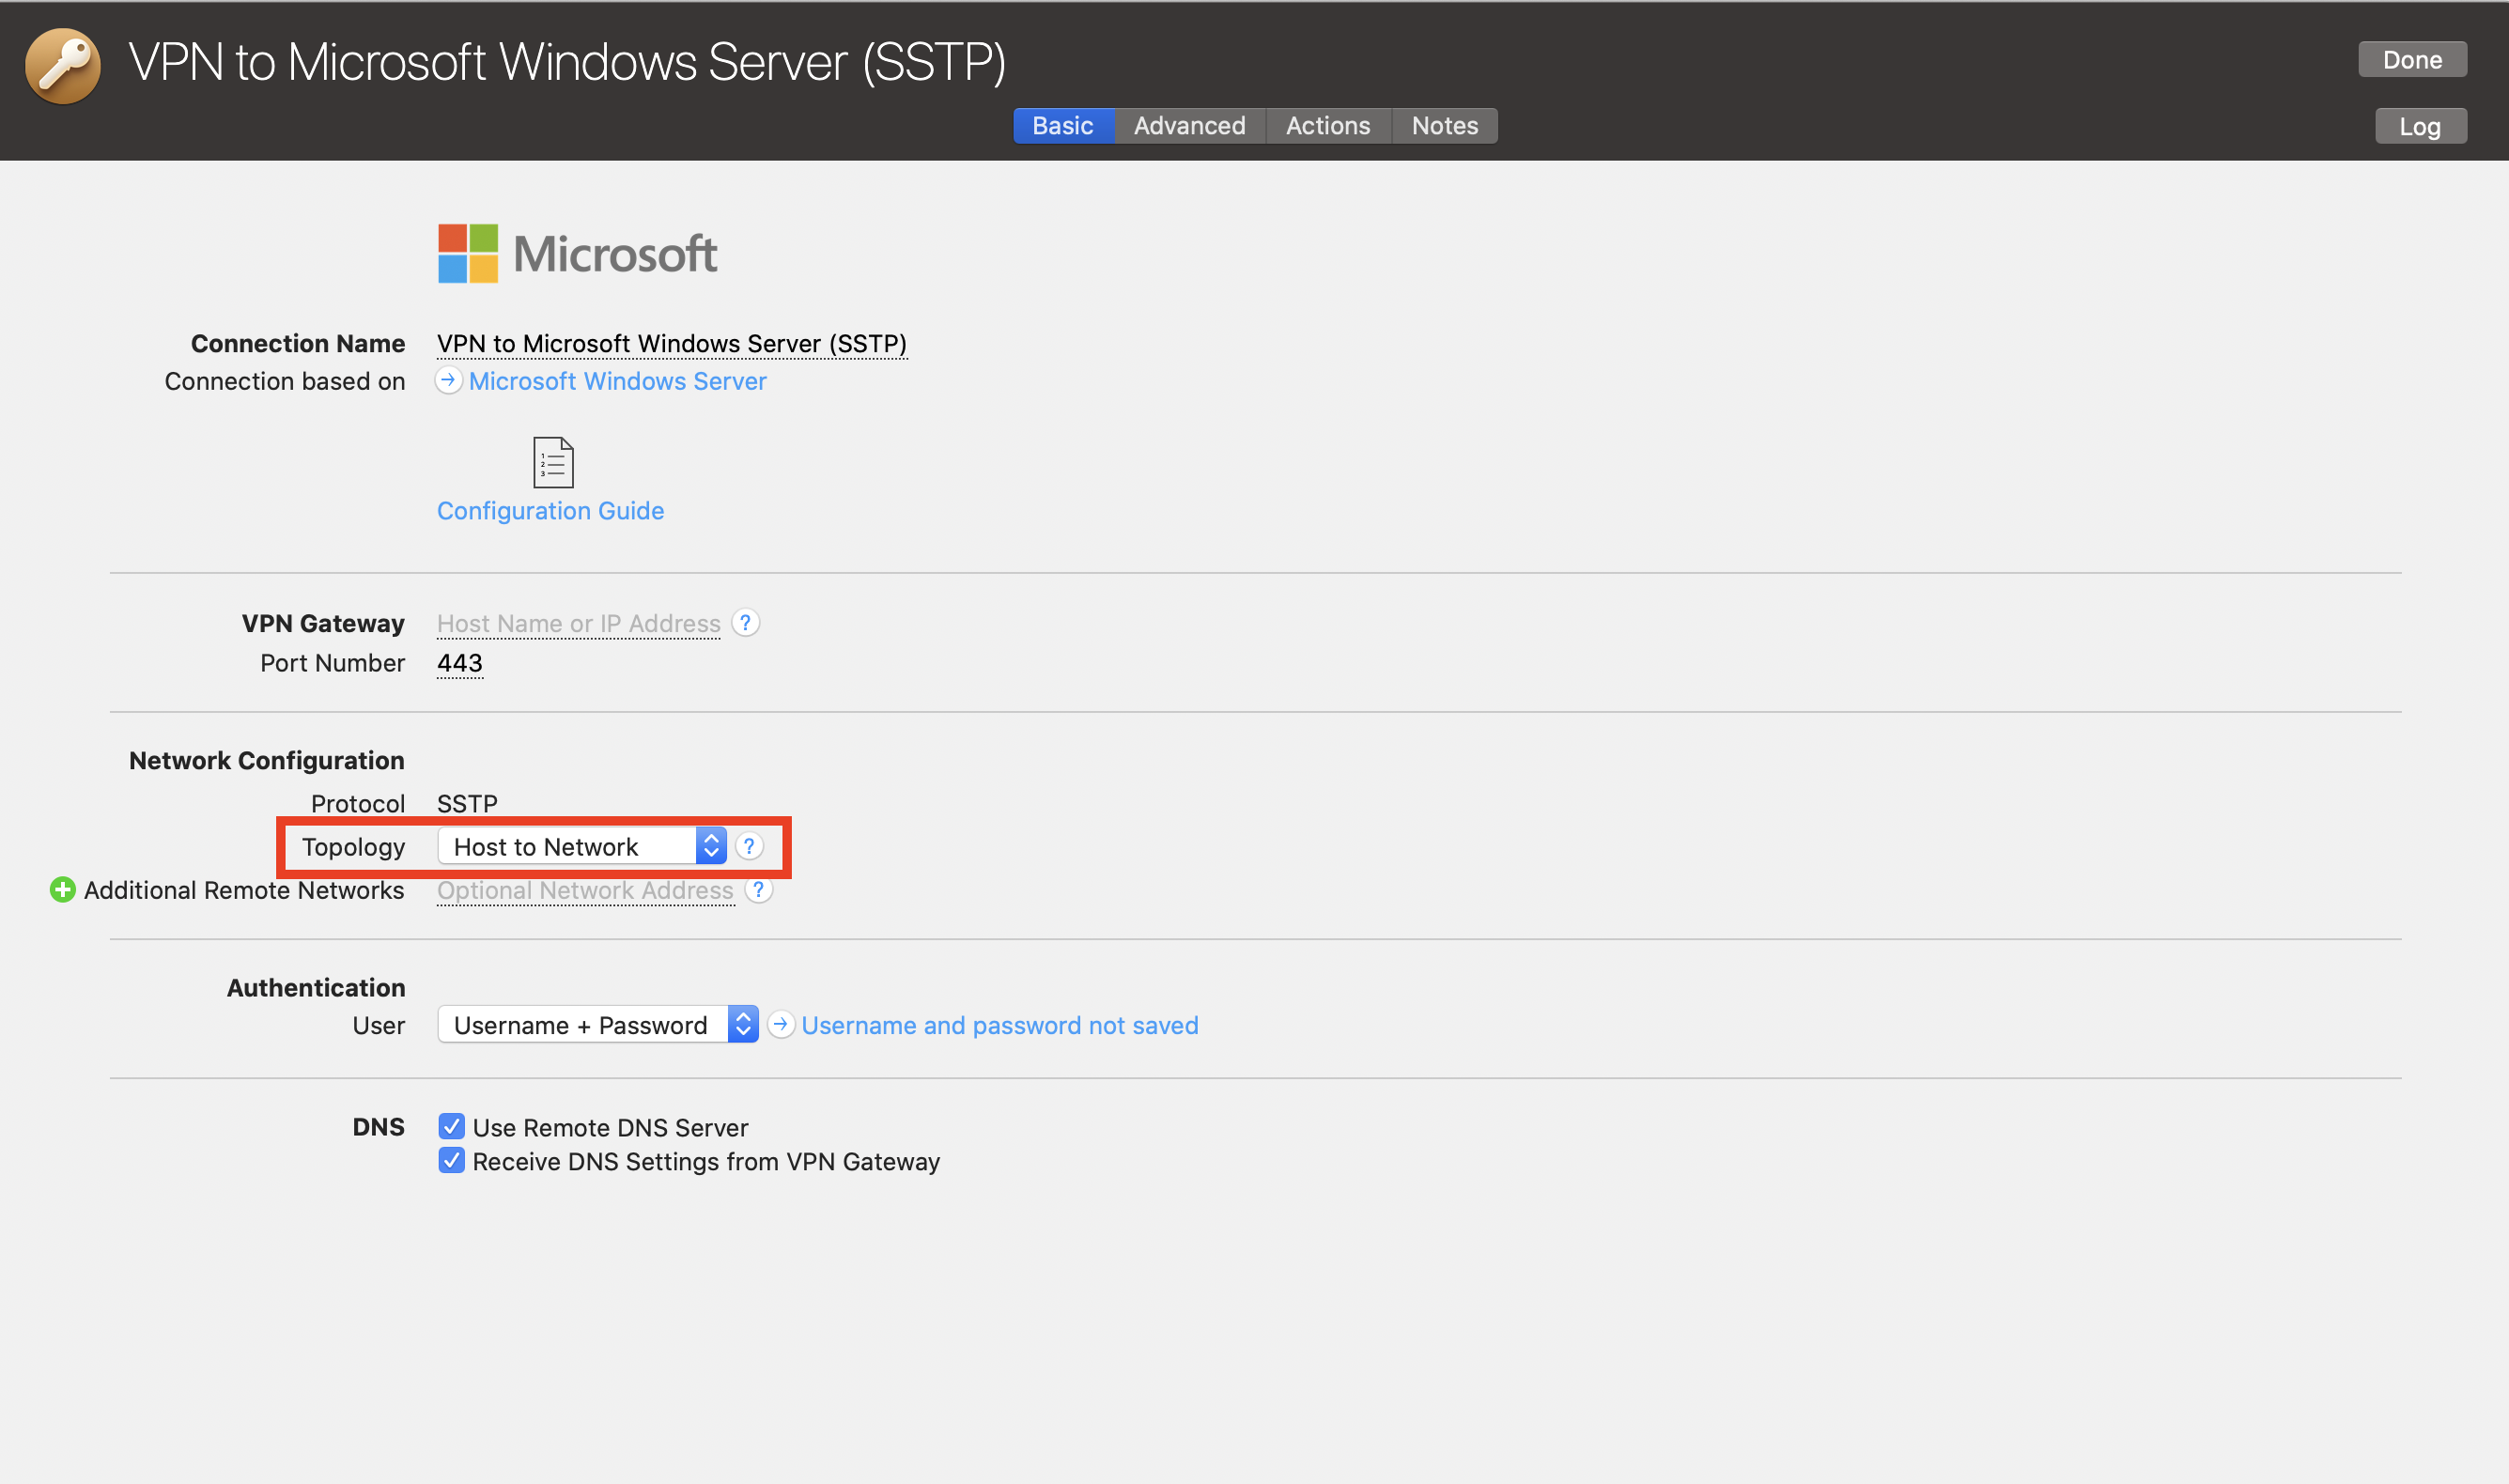
This depends on your settings. The most common setup is “Host to Network“, in which case only traffic to the specified remote network(s) will go through the VPN tunnel.
With a “Host to Everywhere” setup, all traffic – except traffic to the local network(s) – goes through the VPN. A Host to Everywhere connection requires a suitable setup on the VPN gateway.
Sign in to your TP-Link router admin webpage
Find the VPN passthrough settings
Uncheck and then re-check all the VPN passthrough options
Apply the settings
This should reset an internal parameter and allow your connection to work as expected.
- Go to my.vpntracker.com and sign in with your equinux ID and password.
- Under "My Subscriptions" in the sidebar menu, you'll see a list of your current VPN Tracker 365 plans.
- Activate automatic renewals to ensure your license is renewed at your current rate.
- Alternatively, you can let your current license expire and then purchase a new plan at the new customers rate from our online store.
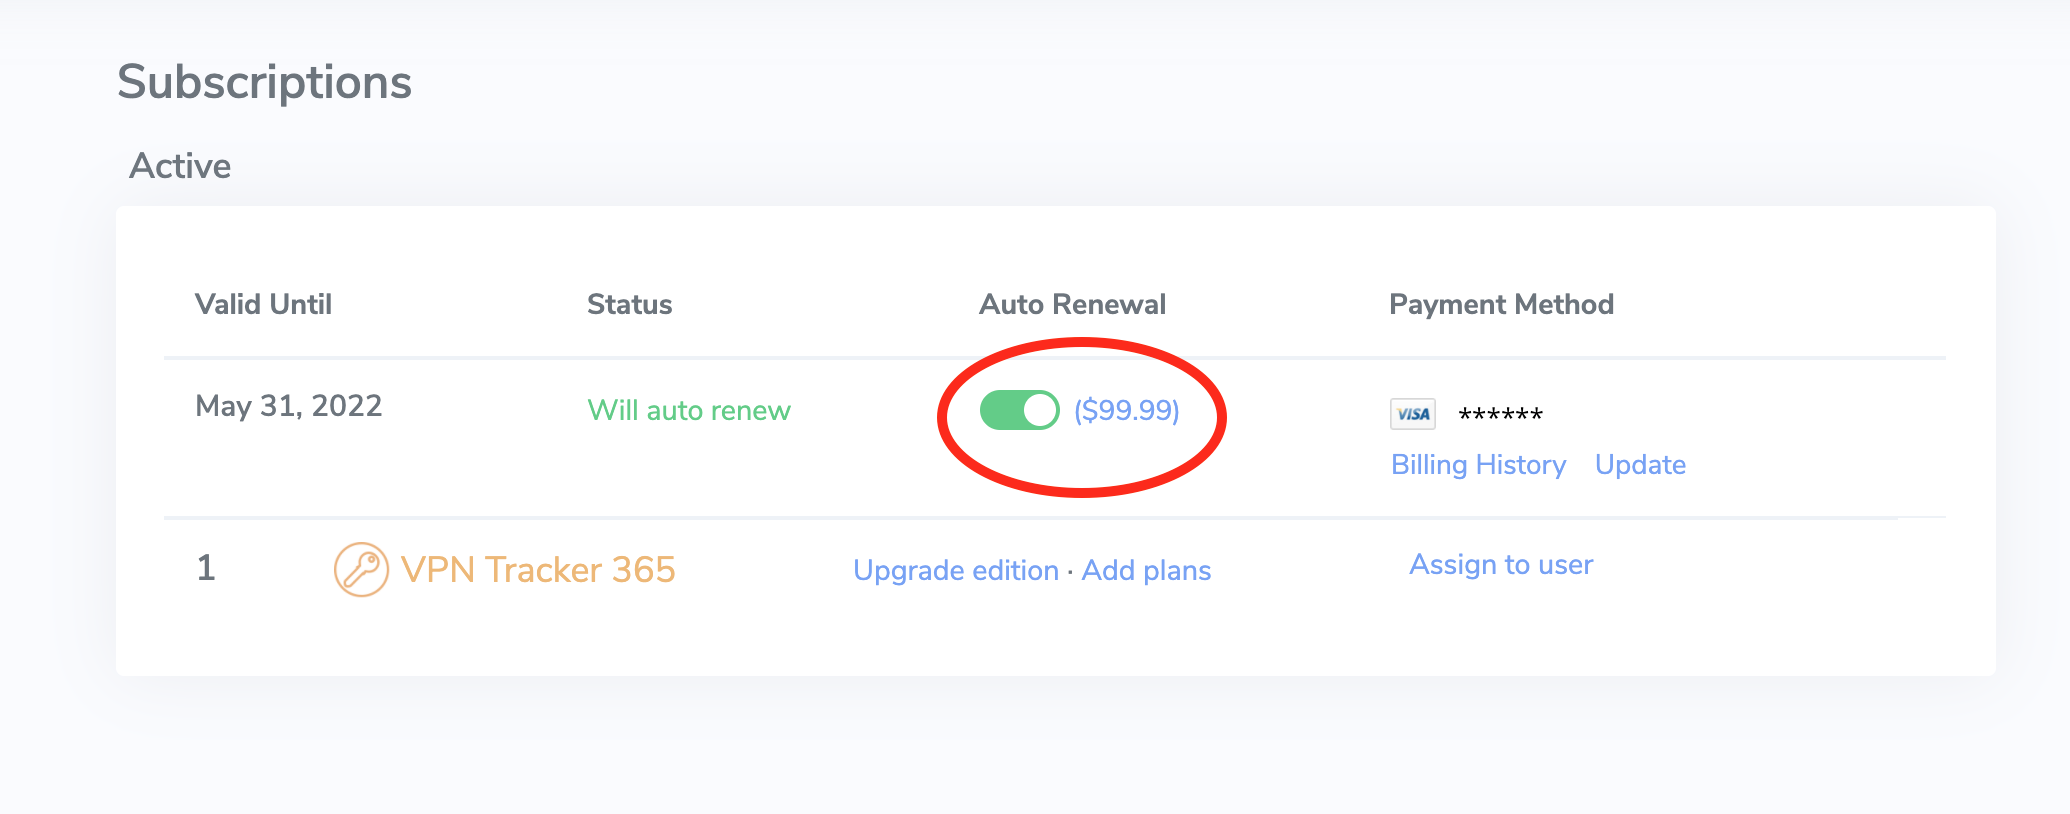 We generally recommend leaving auto-renewal enabled to prevent any disruption to your VPN service: Our system always sends a reminder before your plan will auto-renew to give you plenty of time to deactivate auto-renewal if it's no longer required.
What does this mean?
When DoH is enabled, it bypasses your DNS server and instead, domains you enter into your browser are sent via a DoH-compatible DNS server using an encrypted HTTPS connection.
This is intended as a security measure to prevent others (e.g. your ISP) from seeing the websites you are trying to access. However, if you're using a DNS server provided by your VPN gateway, it allows DNS queries to run outside the VPN tunnel. Moreover, if the VPN specifies a DNS server that resolves internal host names, these are either not resolved at all or resolved incorrectly when DoH is enabled.
How to disable DNS over HTTPS in Firefox
To ensure all your DNS queries run via your VPN's DNS, you will need to disable DoH in Firefox. To do so, open your Firefox browser, go to Firefox > Preferences > Network Settings and deselect the checkbox by "Enable DNS over HTTPS":
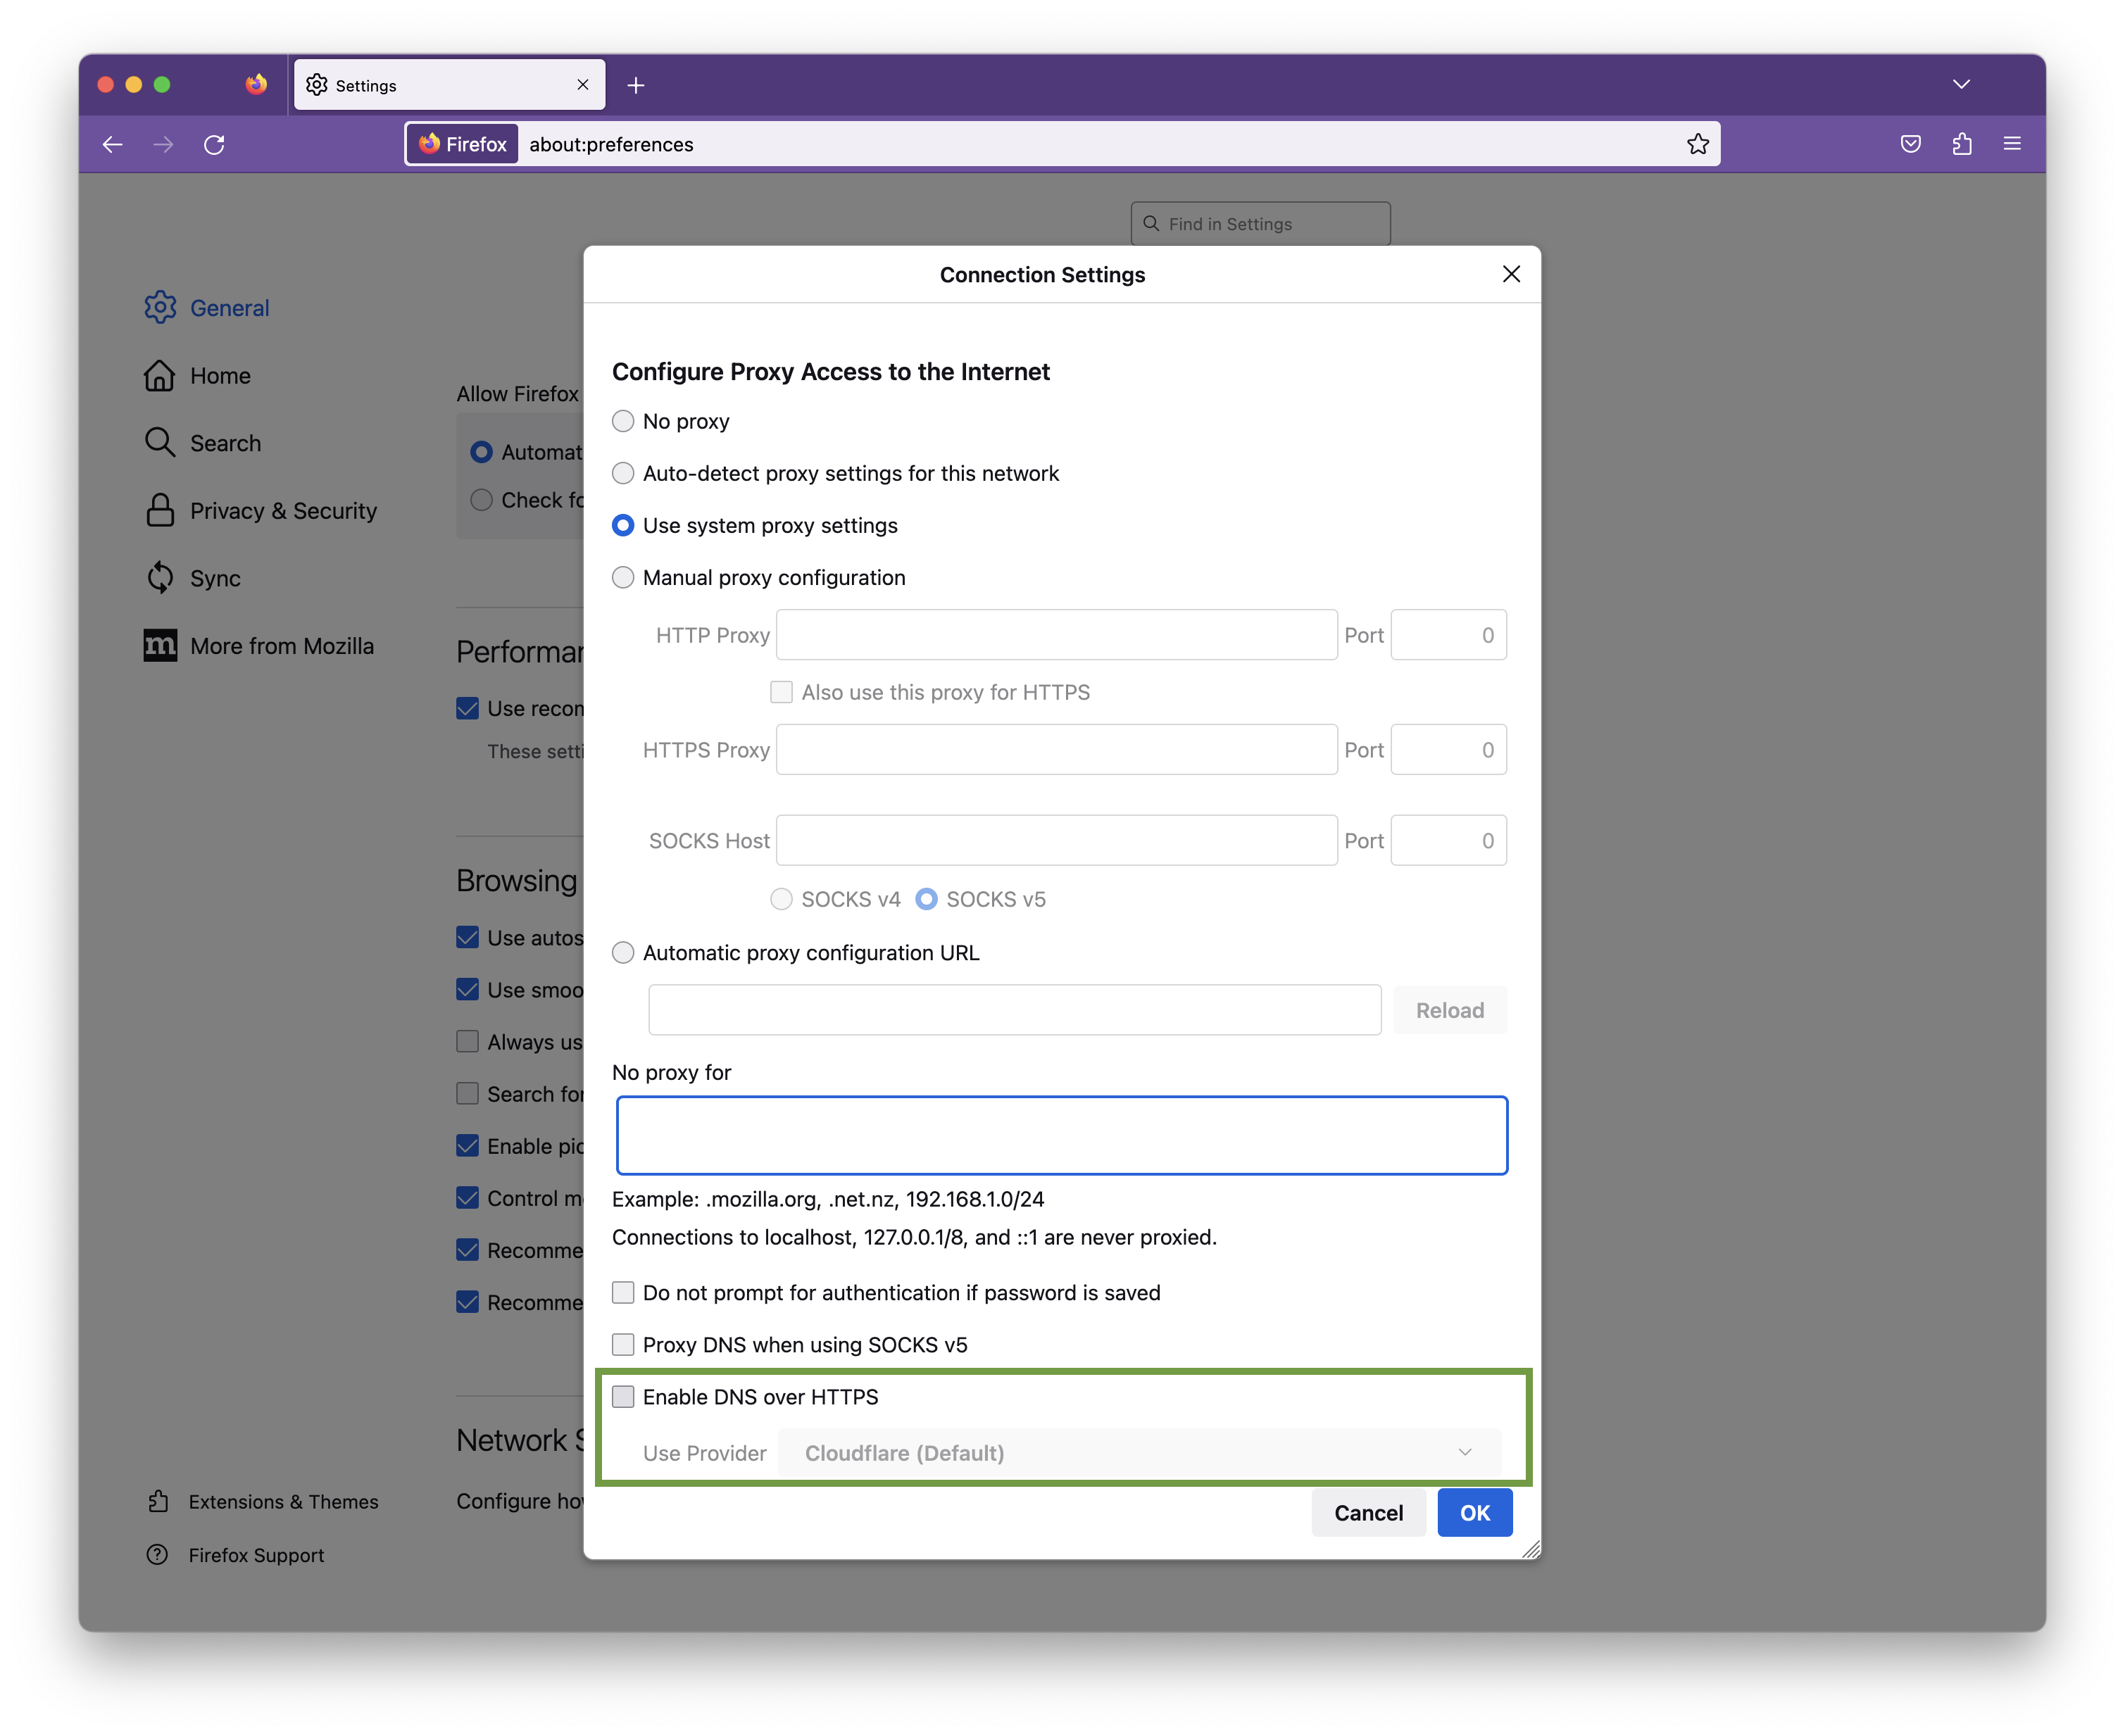
Click OK to save your changes.
In some circumstances, VPN Tracker may not be able to store your account login credentials in your Keychain.
To fix this issue, please try the following:
- Quit VPN Tracker
- Open Keychain Access from Applications > Utilities
- Select your login keychain
- Choose File > Lock Keychain “login”
- Then choose File > Unlock Keychain “login”
On newer macOS releases, you may not see the option to lock/unlock your Keychain. In that case, please enter the following command via the Terminal:
security lock-keychain ~/Library/Keychains/login.keychain
Once it has been locked, you can then unlock your Keychain again:
security lock-keychain ~/Library/Keychains/login.keychain
(You will need to enter your macOS login password to confirm).
Now re-open VPN Tracker and try signing in again.
If the problem still pops up, try this:
- Quit VPN Tracker
- Go back to Keychain Access
- In the search box enter “VPN Tracker User Auth”
- Delete the VPN Tracker User Auth Token entry
Now re-open VPN Tracker and try signing in again.
Last resort: Reset your keychainIf none of the tips above work, macOS has an option to reset your Keychain. Note that this should only be tried as a last resort, as it completely resets your login Keychain:
- Open Keychain Access
- Go to Keychain > Preferences
- Choose "Reset Default Keychains…"
If there are any further issues, please contact our support team and include the application logs from this location:
/Library/Application Support/VPN Tracker 365/var/log.
By itself, the IPsec protocol does not support usernames. If you were given a username from your network administrator for connecting to your corporate VPN solution, there are generally two possibilities:
- Your corporate VPN solution uses the term "username" for "identifiers". Please try to use your username as the "Local Identifier" in VPN Tracker.
- Your corporate VPN solution is using Extended Authentication (XAUTH). You can enable XAUTH in VPN Tracker. The software will then prompt for your username and password when the connection is being established.
Don't worry – it happens to all of us!
Just head on over to our login retrieval page, enter your equinux ID or email address and we'll send you your details.
Recently changed your e-mail address? Send us a message!
The IKE Phase 1 tunnel is only used to ensure a secure connection between VPN client and VPN gateway, comparable to a TLS connection (i.e. HTTPS instead of HTTP). Only IKE messages are exchanged via the Phase 1 tunnel, which are used to keep the Phase 1 connection alive and to negotiate Phase 2 tunnels if necessary. The Phase 1 tunnel has no influence on the VPN speed, only on the initial connection setup, so there is never any reason why you should not always work with the strongest protection in Phase 1, that both sides can support. Since very little data is ever sent through the Phase 1 tunnel, there is no reason not to choose a very long lifetime.
The Phase 2 tunnels are used to encrypt the actual data traffic, so the settings here directly influence the overhead, latency and speed of the VPN connection and must be weighed against the security. Also, large amounts of data are encrypted via the Phase 2 tunnels, so you should not set their lifetime too high. If possible, it is always recommended to use Perfect Forward Secrecy (PFS) in Phase 2, which slows down the Phase 2 connection setup a bit, but completely decouples Phase 2 cryptographically from Phase 1, since an independent session key is negotiated and not derived from the session key of Phase 1.
The lifetimes of the two phases are basically independent of each other. A Phase 2 tunnel may continue to exist, even if the Phase 1 tunnel over that it was negotiated no longer exists. Thus, Phase 1 may have a shorter lifetime than Phase 2. VPN Tracker always negotiates new tunnels in time before the lifetime expires, so that the connection is normally never interrupted. With Phase 2, the tunnels are seamlessly connected, meaning that not a single data packet is lost during the exchange. This is why even with a very short lifetime of just a few minutes, the impression of an uninterrupted connection is created. Frequent changes of Phase 2 tunnels only lead to a little more data traffic and a little more computing work on both sides of the connection.
Important Notes
The lifetime of the tunnels is explicitly not negotiated. The standard allows that a tunnel has different lifetimes on both sides of the connection. The side, where the lifetime expires first, determines the further procedure. Only if VPN Tracker is that side, it can determine what happens next, otherwise VPN Tracker can only react passively. The latter will always result in a short interruption or even a complete loss of the connection in case of Phase 1. For Phase 2, it depends on whether the other side wants to actively negotiate new Phase 2 tunnels or only deletes the existing ones; the latter also leads to a short-term connection loss.
It's always best to set VPN Tracker to the same lifetime as the other side, because VPN Tracker will always try to intervene in time to avoid a connection loss.
Since there are also IKE/IPSec implementations that delete all Phase 2 tunnels as soon as the corresponding Phase 1 tunnel is deleted, it's always a good idea to select Phase 1 on devices to match the maximum VPN session time expected.
A couple of years ago, a team of security experts released a paper describing an attack that can break an IKEv1 Aggressive Mode Pre-Shared Key connection using an attack that would not equally have been possible with an IKEv1 Main Mode Pre-Shared Key connection, leading to the incorrect assumption that Aggressive Mode is inherently insecure. This claim, however, is not backed up by objective facts. What most people don't know, part of that attack was the ability to guess the Pre-Shared Key (PSK) using a brute force attack and such a brute force attack can only be successful if the PSK is weak. A PSK is also just a password and as with every password, choosing a weak password always leads to poor security. As long as your PSK is at least 14 characters long (the longer the better), consists out of lower case letters, upper case letters and digits, and was randomly generated, so it's impossible to somehow guess it, and as long as your Phase 1 hash algorithm is at least SHA1 (or better, we recommend SHA-256 if possible), there's absolutely no reason to consider IKEv1 Aggressive Mode with Pre-Shared Key as less secure than IKEv1 Main Mode with Pre-Shared Key. If you want to be even more secure, switch to certificate based authentication instead of PSK if possible as then the attack is not possible at all.
Technical background:
The Pre-Shared Key (PSK) is not a password used for encryption of any data, it's used for authentication, just when you log in to a website using a username and a password. During Phase 1, both sides must prove to each other to know the PSK. This cannot be done by just sending it to the other side, as if the other side didn't know it before, it will know it after receiving it. Instead both sides calculate a number (a hash digest) out of data they exchanged so far (data that will be different every time you start a new connection, which ensures the calculated value will be as well) and the PSK. Only this digest is send to other side. The other side can now verify that digest by performing the same calculations and comparing the result with the digest received. If both are equal, the sender must have used the same PSK in the calculation, which proves knowledge of the PSK. Then the receiver also calculates such a digest, using a slightly different formula as before, leading to an entirely different result, and sends it back in reply to also prove its knowledge.
The differences between Main Mode and Aggressive Mode is simply that in Main Mode the digest is exchanged encrypted because the session key exchange already negotiated a session encryption key when the digest is exchanged, whereas in Aggressive Mode it is exchanged unencrypted as part of the key exchange that will lead to a session key. By snooping the connection establishment of an Aggressive Mode connection, the attackers were able to get the digest as well as all values required to calculate that digest, except for the PSK itself. Please note that this alone doesn't mean the connection is broken already, it only means that the attackers now have enough data to start guessing the PSK using a brute force or dictionary attack. Only if the PSK is too weak to withstand those attacks and the attackers are able to correctly guess it, the connection will be broken. That's why a good, secure PSK is essential.
The same attack is in fact also possible with a Main Mode PSK connection, it just requires some extra work. For a Main Mode connection it's not enough to just snoop the traffic, the attackers would need to perform a so called Man-in-the-Middle (MitM) attack, allowing them to capture and manipulate all traffic exchanged. By performing a MitM attack, attackers can break the key exchange and thus will be able to decrypt all the exchanged packets. Doing so will not make it possible to break into your VPN, they still need to know the PSK for that, otherwise they cannot successfully authenticate to the other side and then Phase 1 will never complete, but that way they can get all the information required to start guessing on the PSK, just as in case of a an Aggressive Mode connection. And if an attacker is already able to snoop on your VPN traffic (which is required to attack Aggressive Mode), it's very likely that attacker is equally possible to perform a MitM attack and in that case using Main Mode will not offer you any additional protection.
A PSK out of 11 random alphanumeric characters offers an entropy of approx. 64 bits, that's 2^64 possible values. Modern high end graphics adapter (as of 2015) can calculate in the order of 1 billion SHA-256 hashes a second. On average one has to try 50% of all possible values to find a match, wich would be about 292 years. Yet if the attackers have an array of 100 such graphics adapters, it would "only" be around 3 years. If the PSK is 14 characters, the entropy is about 80 bits and you are already at 19,154,798 years. Now even having 10,000 graphics adapters would help a lot. Also one must consider the costs of such an attack, which is not so much the cost of buying all these graphics adapters, rather their power consumption when all these graphics adapters run at maximum current 24 hours a day and that for years, decades, or even centuries. The power costs will be billions of dollar and all that to just break one single PSK connection in the entire world. And whenever you change the PSK, an attacker must start all over, so if you change the PSK regularly, let's say once a year, an attacker has at most one year to find it; that's very ambitious, even for a weak PSK.
VPN Tracker for Mac fully supports all the latest macOS versions, including macOS Sequoia
Starting from macOS 11, Apple have made some key changes to the macOS security architecture. VPN Tracker for Mac offers full support for all the latest macOS versions. This includes support for: IPsec VPN, IKEv2 (Beta), OpenVPN, L2TP VPN, PPTP VPN, SonicWall SSL VPN, Fortinet SSL VPN, Windows SSTP VPN, Cisco AnyConnect VPN and WireGuard® VPN.
Tip: Sign up for VPN Tracker Insider Updates to get Beta releases as soon as they are available.
WireGuard® is a registered trademark of Jason A. Donenefeld.
Symptom
As soon as you connect your VPN tunnel, Skype is not able to make calls any longer, however calls started prior to connecting the VPN continue to work.
Solution
Make sure the field Local Address is not empty. If it is, fill in a private IP address. A private IP address has the following form:
192.168.x.x10.x.x.x172.y.x.x
x: A number of the range 0 to 255.
y: A number of the range 16 to 31.
Only rule: It must not be an IP address from a remote network on the other side of the VPN tunnel (must not partially match an entry of the field "Remote Networks"), as choosing such an address will make the tunnel stop working (it will connect, but you cannot really reach anything over it).
Alternate Solutions
If the solution above does not fix your issues, make sure that
- DNS resolution still works once the VPN tunnel is up.
- Public Internet servers are still reachable once the VPN tunnel is up.
- In case of a Host to Everywhere connection, make sure the VPN gateway does not block any network traffic that is crucial for Skype to work.
Explanation
VPN Tracker creates a virtual tunnel interface for every VPN tunnel. Like any network interface, this virtual tunnel interface requires an IP address to be functional as an IP network interface. If your VPN gateway assigns you an IP address, the assigned address is applied to the tunnel interface. If not, the address you put into Local Address will be used. If you leave local address empty, the IP address of your primary network interface will be used.
In the last case, your system ends up with two interfaces with identical IP addresses. This is allowed and usually not a problem, unless a software does “stupid things”, like querying the network interface for a given IP address and then ignoring the order of precedence of the returned results.
Sie können mit unserer VPN Wizard App für FritzBox eine neue Verbindung entsprechend konfigurieren.
Ihre neue VPN Verbindung für Fritzbox können es mit der kostenlosen VPN Tracker 365 Demo testen:
http://www.vpntracker.com/de/download.html#vpnt365
With both SMB (Windows File Sharing) and AFP (Apple File Sharing), low latency connections are key to achieving good performance. This is of course assuming that you already have a connection with reasonable bandwidth in between the two VPN endpoints (this can be easily verified by transferring a larger file through HTTP or FTP).
Using SSL VPN? Switch to IPSec
In comparison to SSL VPN, IPSec is able to offer much faster connection speeds as it runs on the network layer – level 3 of the OSI – meaning it’s much closer to the physical hardware. This will give you a faster VPN performance.
Learn more in this blog post.
Finder Settings
If you are using the Finder and the issue is mostly with listing folders (but not so much when actually copying files), try turning off icons/icon previews in the Finder's View Options (Cmd-J).
Reducing Latency
If you experience performance issues both when listing folders and when transferring files, your aim should be to reduce latency. Some ways to reduce latency include:
- Avoid high-latency Internet uplinks (e.g. satellite, some types of wireless providers, line aggregation, ...).
- When using a DSL line, see with your ISP if you can get "fast path" enabled (= interleaving turned off). ISPs sometimes market this as an option for online gaming, but it's also very helpful for AFP/SMB or connecting to some types of database backends.
- Make sure VPN traffic is appropriately prioritized in order not to be slowed down by someone else using the same Internet connection.
To measure latency between the two endpoints of the VPN, use ping to a host on the other end of the connection (or, when pinging from the client end, ping the VPN gateway). For your convenience, VPN Tracker has a ping utility built right in, it can be found in the Tools menu.
To measure latency of each endpoint's individual uplink, it's often helpful to do a ping the local router (to make sure there are no unnecessary latencies introduced in the local network) and the ISP's first router (to get an idea if enabling fast path or switching ISPs may be a suitable measure to decrease latency).
If you cannot reduce latency any further:
If you are in a situation where you cannot reduce latency any further (or where the base latency from the distance between the two endpoints itself is so large local measures won't make much difference), consider switching to a file transfer protocol that is less vulnerable to latency, e.g. WebDAV or FTP, or use measures such as reducing the number of files and folders in a hierarchy to increase performance.
To establish a VPN connection to a certain location (such as your office), you will need a VPN gateway at that location. This gateway could be a hardware VPN gateway device (see our compatibility page for compatible devices and setup guides).
The VPN gateway needs to be connected to the Internet (e.g. to a DSL modem or similar), preferably with a static IP address or it should be capable of using a service like DynDNS.org to map its dynamic IP to a hostname. Configuration is easiest if the VPN gateway is also the router (default gateway) of its network. If the VPN gateway is not the router of its network, a suitable routing setup may be necessary for traffic over the VPN to be routed correctly.
Configuration details can be found in the configuration guides for specific devices.
To get connected, follow these 3 steps:
- Open VPN Tracker and add a new WireGuard® connection
- Upload your WireGuard® configuration file or scan your QR code
- Save your connection to your account using secure end-to-end encryption
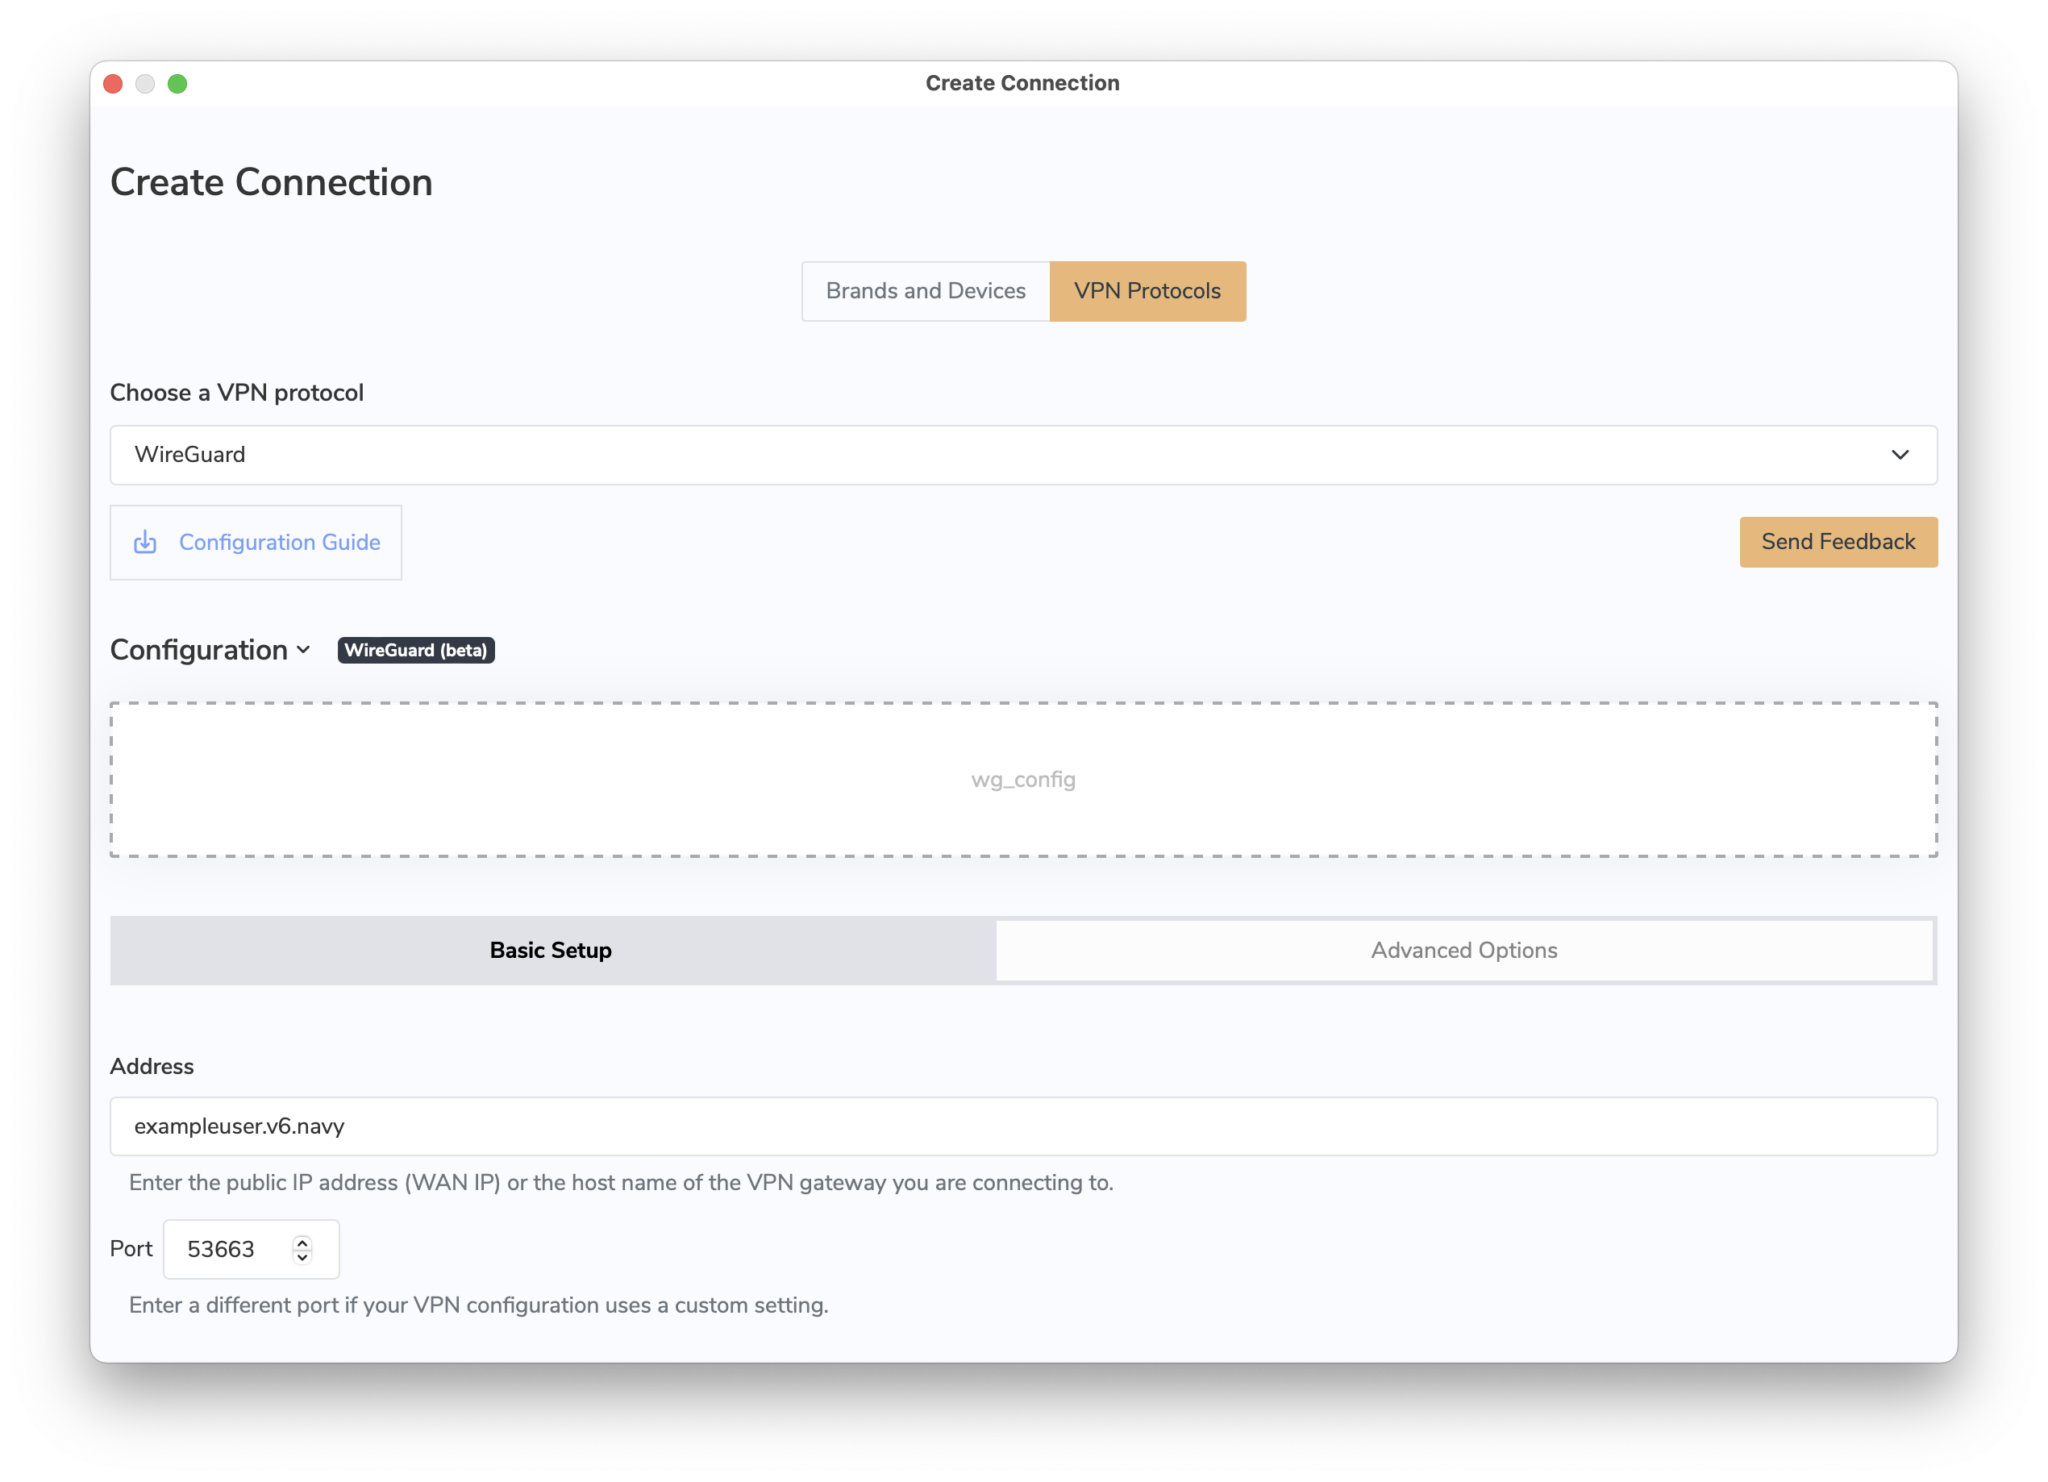
You can now connect to your WireGuard® VPN server on Mac, iPhone or iPad.
→ More information on connecting to WireGuard® VPN in VPN Tracker
WireGuard® is a registered trademark of Jason A. Donenfeld.
Here's how it works:
- Find your PPTP VPN connection settings in the Control Panel of your Windows PC
- Start VPN Tracker 365 on your Mac and click the "+" to create a new PPTP connection
- Copy the connection settings from the first step into the configuration window
- Finally, start up your PPTP connection to test
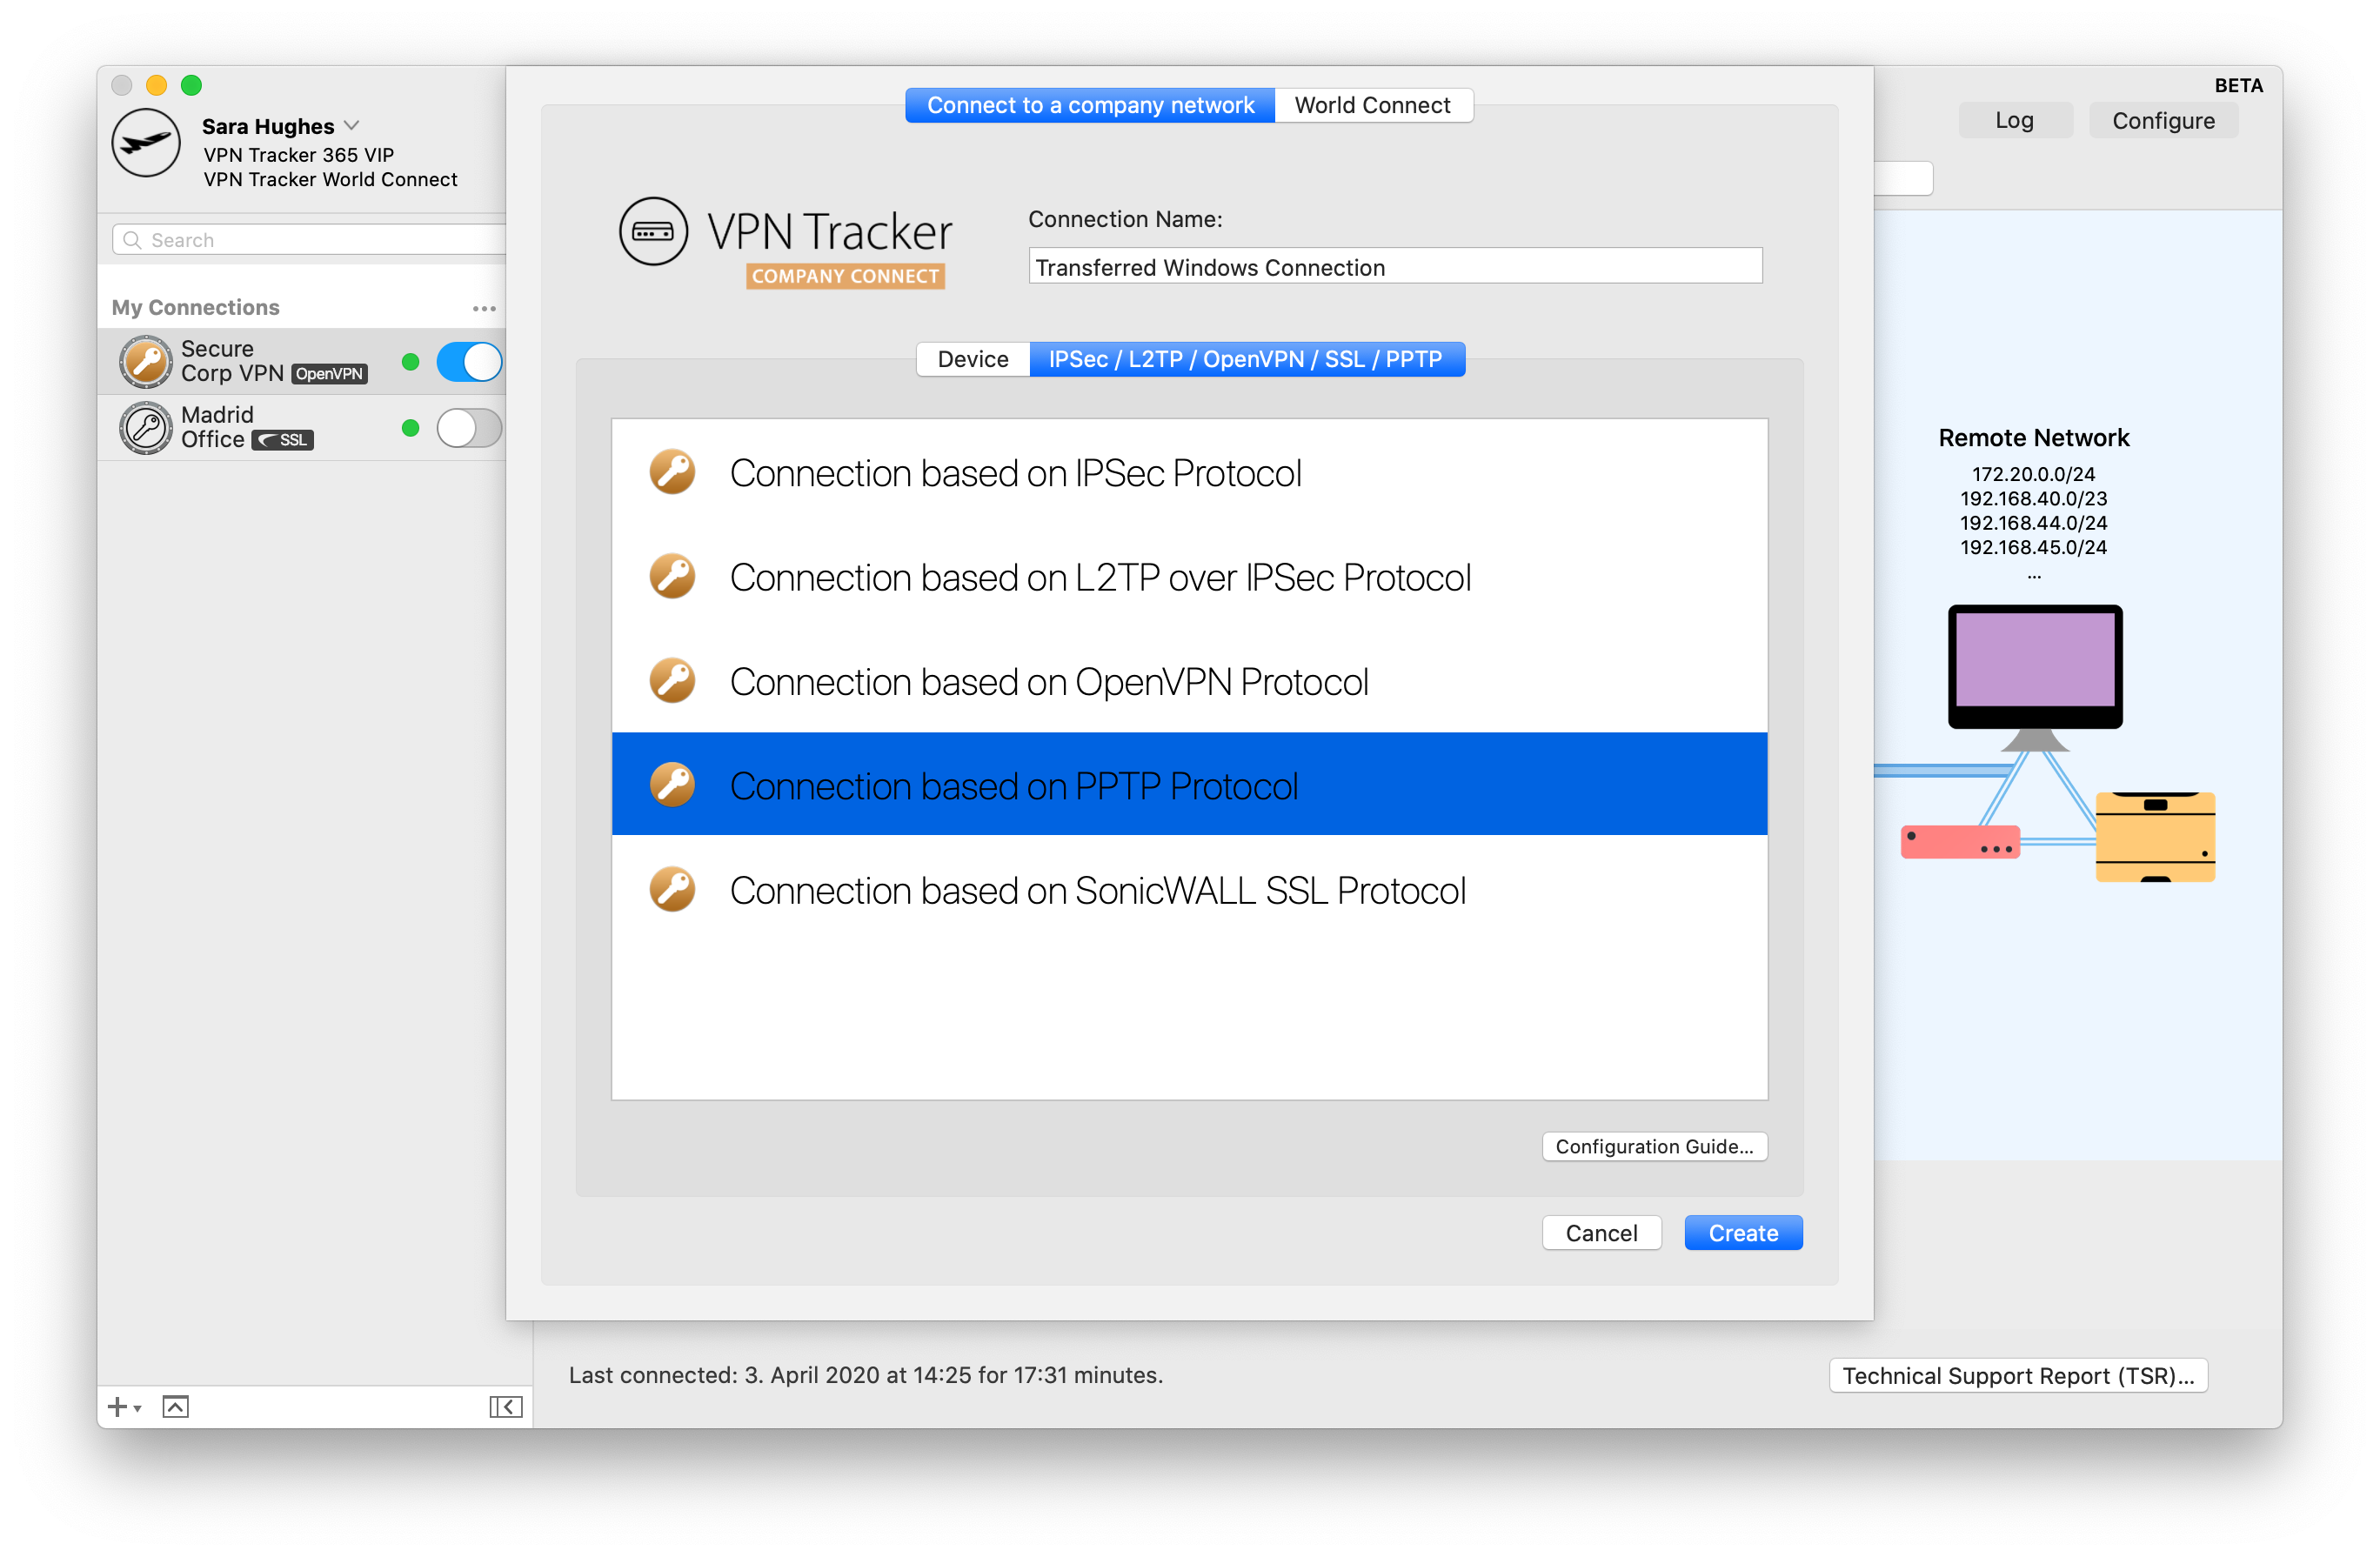
You can now use your Windows PPTP VPN connection on your Mac, thanks to VPN Tracker 365. If you require a more detailed walkthrough, please check out this step-by-step PDF guide: Migrating a Windows PPTP VPN Configuration
Find out more about PPTP VPN under macOS Big Sur
- If the app you want to quit is in your dock, hold the "Option" (⌥) key and right-click on the app icon, then, select "Force Quit" from the menu.
- You can also hold down "Option" (⌥) + "Cmd" (⌘) + "Esc" which will trigger a window with a list of apps you have running. To force quit one or more of these apps, simply select it from the list and click the "Force Quit" button.
1. To use PPTP behind a NAT router, your router must support "PPTP Passthrough" and this option also needs to be enabled.
Please ensure that your router supports "PPTP Passthrough" and please ensure it is also enabled. Check your router's manual. If your router has no support for it, you may have to replace it if you require to use PPTP.
2. Please also check if your ISP is running "DS Lite" connection to you. With "DS Lite", users only get private IP addresses that are network address translated at the provider and this is usually incompatible with PPTP. You require a public IPv4 address or switch to a different VPN protocol. Call your ISP and ask for "a public IPv4 address".
To get started, go to "File" > "New" > "VPN Shortcuts"
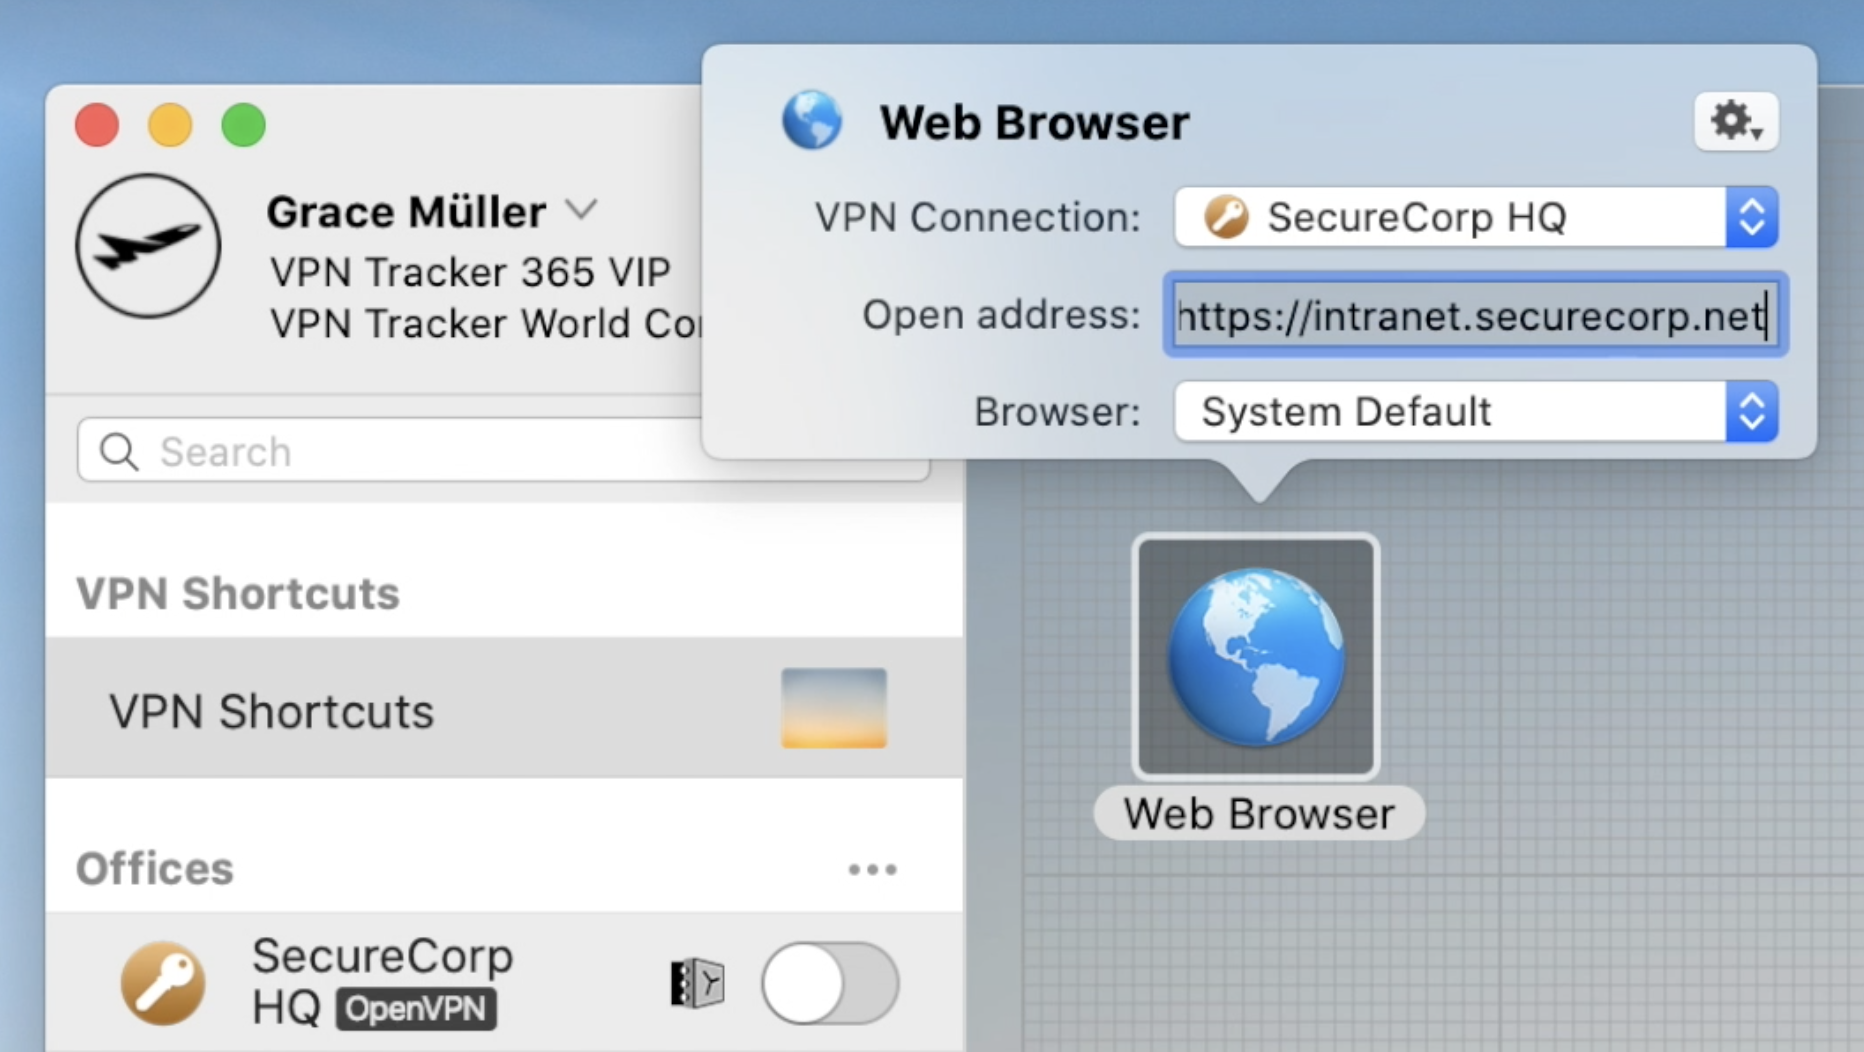
Open the Shortcuts Dock by clicking on the arrow to reveal all available Shortcuts in VPN Tracker 365. Then, drag out the icon for the application or service you would like to configure (e.g. internal website).
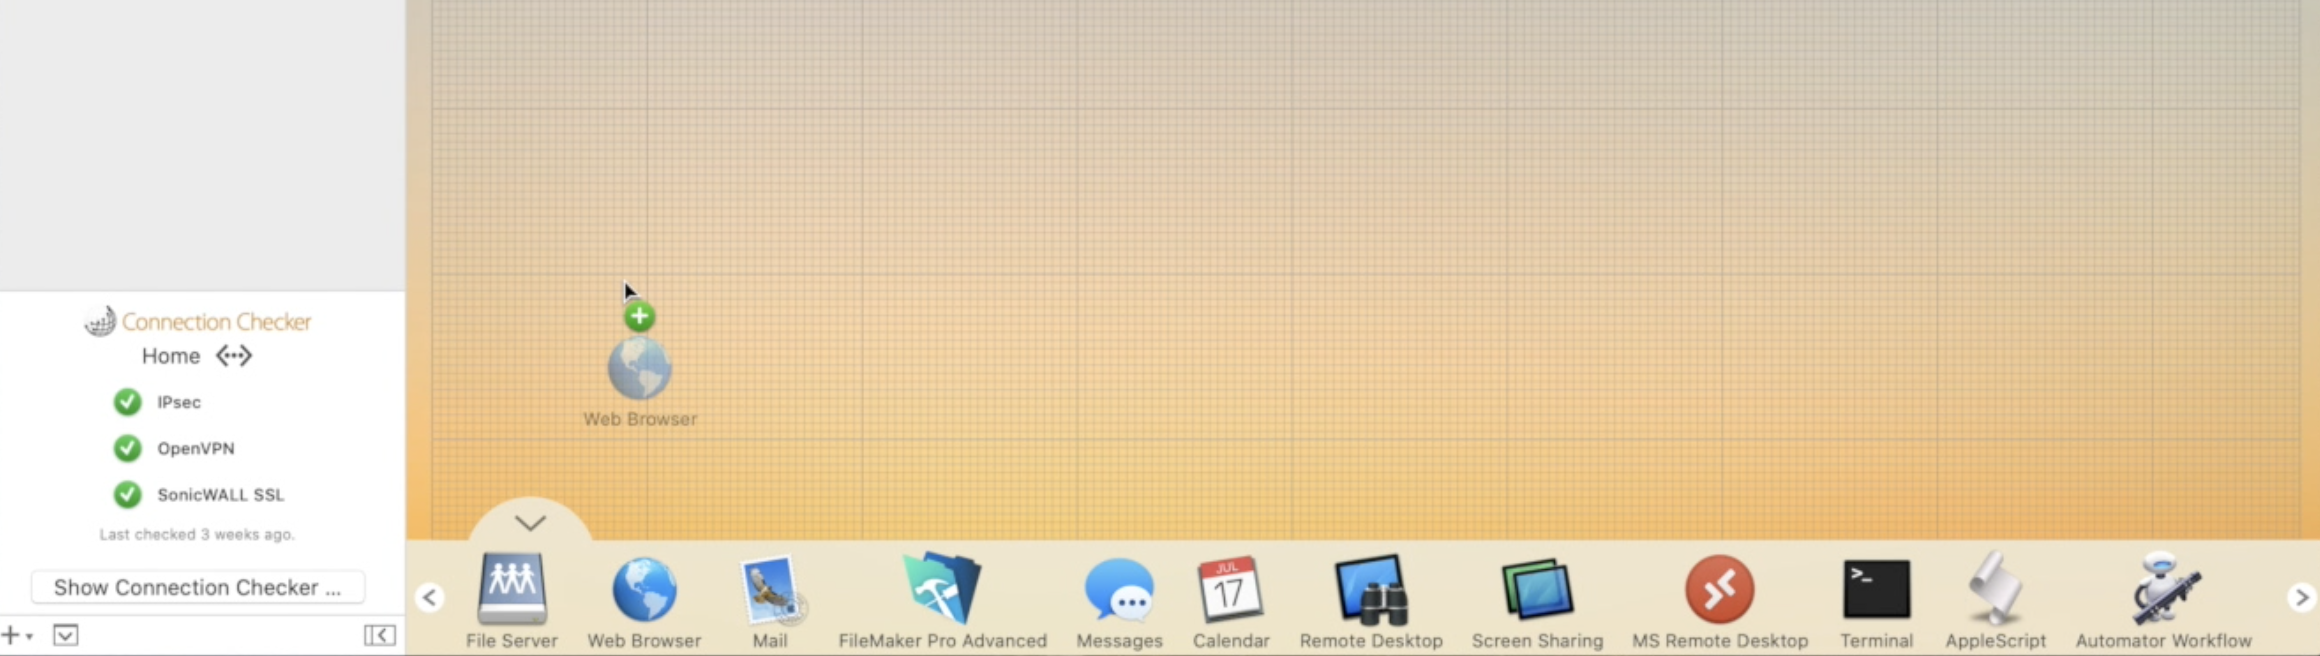
Now configure your Shortcut by filling in all the requested information as prompted by VPN Tracker 365. If you are unsure of any details, your network admin or a member of our support team will be able to help you get set up.
Continue this process until you have built up a collection of Shortcuts for all your most-used external services. Then, exit the editing mode by clicking again on the arrow at the bottom of the window to close the Shortcuts Dock:
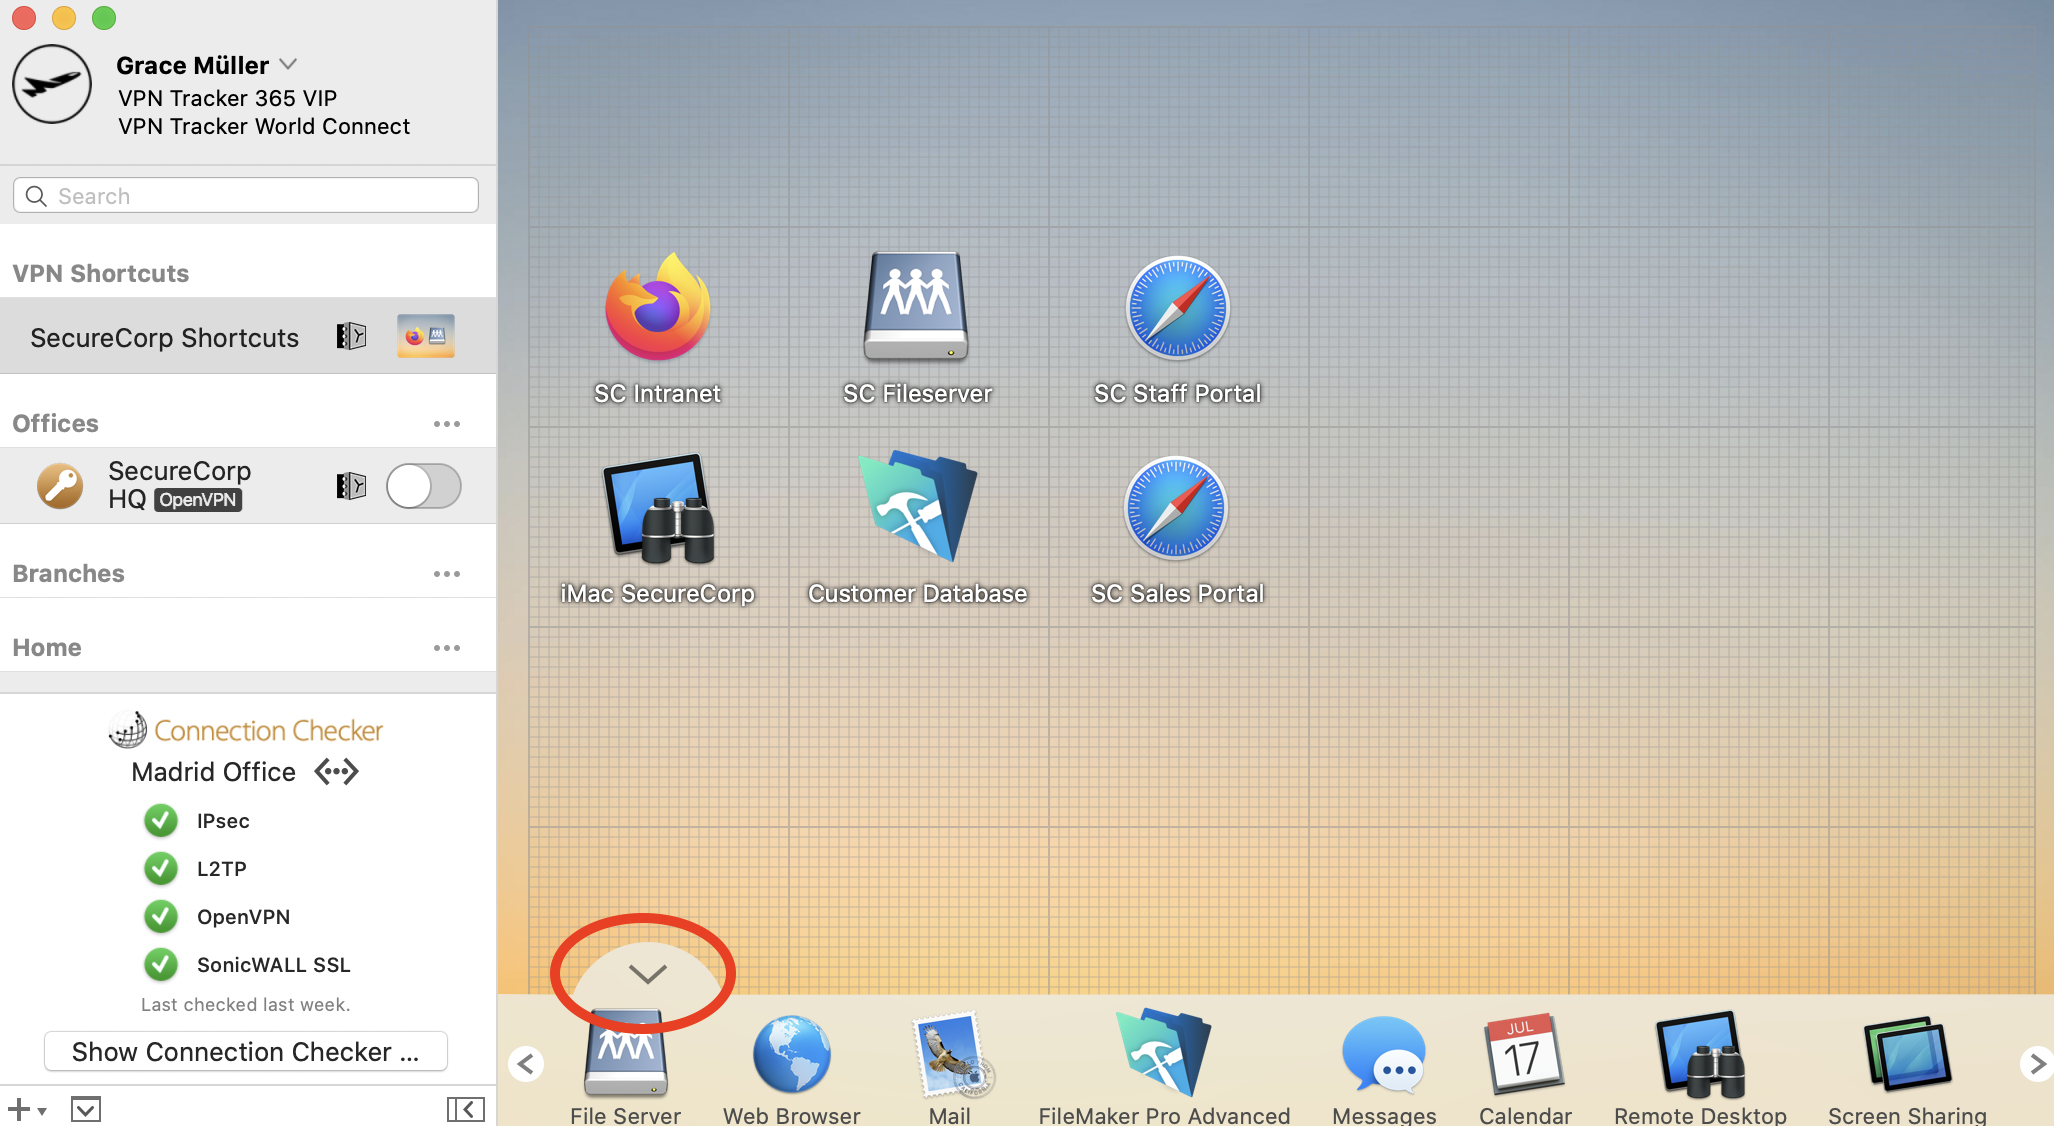
To test your Shortcut, simply click on the icon. This should launch your VPN connection and instantly start up your service.
Want to see Shortcuts in action? This 2 minute video tutorial shows you how to set up VPN Shortcuts in VPN Tracker 365:
Open the VPN Tracker 365 app, then go to File > Import > System VPN Connections.
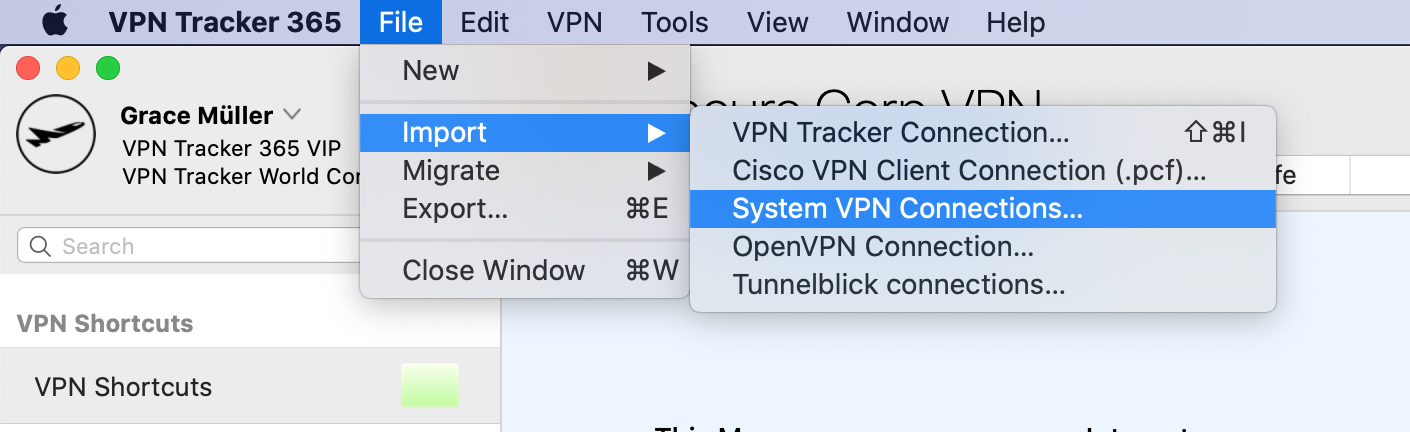
VPN Tracker will scan your Mac for VPN connections that are compatible with VPN Tracker 365. You can then select and import the connections you want.
Please note that only compatible connections can be imported.
For a certificate to be available in the "Local Certificate" list, it must be present in the Mac OS X Keychain with its corresponding private key.
You can easily check this in the Keychain Access application: If a certificate is listed under "My Certificates" (and not just "Certificates"), its private key is available and you will be able to select it in VPN Tracker as the "Local Certificate".
Important note for CheckPoint VPN users:
The Mac OS X Keychain Access application currently does not understand how to read private keys from some CheckPoint generated certificates.
To properly import the certificate into the Mac OS X Keychain, first convert it using the openssl command line tool:
- Open a Terminal ("Applications" > "Utilities" > "Terminal")
- Convert the certificate to PEM format:
openssl pkcs12 -in /Users/joe/Desktop/MyCheckPointCert.p12 -out /tmp/out.pem
Replace /Users/joe/Desktop/MyCheckPointCert.p12 with the path to the actual certificate that you want to convert.
You will first be asked for the password that the certificate is encrypted with. If you do not know it, please ask the administrator who has created your certificate for you. You will then be asked twice for the password that will be used to protect the exported PEM file. You can use the same password that the original certificte was encrypted with. Note that no characters will appear on screen while you type in your passwords. Simply type the password and press the return key.
- Convert the PEM file back to PKCS#12 (.p12) format:
openssl pkcs12 -in /tmp/out.pem -export -out ~/Desktop/MyFixedCheckPointCert.p12
Replace /Users/joe/Desktop/MyFixedCheckPointCert.p12 with the path where you want the fixed certificate to be stored.
You will first be asked for the password that you have just used for exporting to the PEM file, and then for a password to protect the fixed .p12 file with. You can again use the same password for everything.
Now double-click your fixed certificate file to import it into the Mac OS X keychain.
If you're running FortiOS 3, please make sure you are running at least MR6 patch 2. Previous firmware releases have an issue that will cause the device to respond incorrectly to VPN Tracker's attempts to use XAUTH in combination with an Aggressive Mode based connection.
Some kinds of software may cause issues with VPN Tracker:
- Personal Firewalls / Desktop Firewalls
- Protection Software (e.g Virus Scanners, Malware Protection)
- Other VPN Clients / VPN Software (for example NCP Client)
Personal Firewalls usually ask the user, if an app should be allowed to send network traffic. It’s important to grant VPN Tracker full network access. If you have already added rules for VPN Tracker, please whitelist VPN Tracker.
Protection Software often sees VPN traffic as a potential source of threat, as it isn’t able to analyze that traffic because of its very strong encryption. Please ensure VPN Tracker is ignored by any protection software running on your Mac and allow VPN traffic to pass through.
Other VPN clients should not be a problem, if they are designed to co-exist with othe VPN apps. Unfortunately, not all other clients are and some capture all VPN traffic as soon as they are installed, even if the app is not running.
In these situations, you may need to uninstall the VPN client - we also suggest asking the vendor to improve its “cooperation” with other VPN apps.
Here are some common examples of the types of apps mentioned above. If you are uncertain whether any of these applications may be installed on your system, try the following:
- Open the app “Terminal”
- Copy and paste the following command:
kextstat | grep -v com.apple
You’ll get a list of all kernel extensions that are not from Apple. Just compare that list with the identifiers in parenthesis below:
- Little Snitch
(at.obdev.nke.LittleSnitch)
- TripMode
(ch.tripmode.TripModeNKE)
- Sophos Anti Virus
(com.sophos.kext.oas, com.sophos.nke.swi)
- Symantec Endpoint Protection / Norton AntiVirus
(com.symantec.kext.SymAPComm, com.symantec.kext.internetSecurity, com.symantec.kext.ips, com.symantec.kext.ndcengine, com.symantec.SymXIPS)
- Kaspersky Internet/Total Security
(com.kaspersky.nke ,com.kaspersky.kext.kimul, com.kaspersky.kext.klif, com.kaspersky.kext.mark)
- Intego Mac Internet Security
(com.intego.netbarrier.kext.network, com.intego.virusbarrier.kext.realtime, com.intego.netbarrier.kext.process, com.intego.netbarrier.kext.monitor)
- Fortinet FortiClient
(com.fortinet.fct.kext.avkern2, com.fortinet.fct.kext.fctapnke)
- Cisco Advanced Malware Protection (AMP)
(com.cisco.amp.nke, com.cisco.amp.fileop)
- TUN/TAP based VPN Clients
(net.sf.tuntaposx.tap, net.sf.tuntaposx.tun)
- eset Security Products
(com.eset.kext.esets-kac, com.eset.kext.esets-mac und com.eset.kext.esets-pfw)
Recently, root certificates for "Let's Encrypt" expired. Apple has decided not to update root certificates for OS X versions older than macOS 10.12. This means that when apps or Safari on your Mac access websites using Let's Encrypt root certificates, they will not load correctly.
Note: this is a general OS X issue that you will want to address to ensure you can access all websites and services.
This issue also affects the secure communication between VPN Tracker and the my.vpntracker.com account service.
How to fix this issue- Download the latest VPN Tracker version for your system:
- Mac OS X 10.9 or 10.10: VPN Tracker 365 20.0.1
- Mac OS X 10.11: Get the latest VPN Tracker 365 version
- Install the root certificate fix
- Visit our certificate fix page
- Download the fix
- Open the profile in System Preferences and choose "Install"
- Re-launch VPN Tracker and sign in again
If you are still experiencing the same problem, please try this:
- Open Safari
- Go to Preferences > Privacy > Manage website data
- Search for 'equinux' and 'vpntracker' and choose 'Remove all'
Older VPN Tracker versions may also have issues due to certifcates as described above. As these versions are end-of-life, we can no longer offer support for them. The steps above should also apply to these versions. For support and to use VPN Tracker on the latest macOS versions, please switch to a new VPN Tracker plan.
VPN Tracker or equinux have nothing to do with this password. Your VPN gateway just tells VPN Tracker "Ask the user for a username and a password and tell me what the user has entered" and that is what VPN Tracker does and in respond to the information the gateway replies "Sorry, but that is not valid username-password-combination, I can't let you in, bye".
In VPN Tracker you can just click on the blue label next to the XAUTH setting and the XAUTH dialog will appear; just overwrite the existing values with new values.
See page 16 in our manual
If it is not up-to-date, please check the dynamic DNS configuration on your VPN gateway.
There is a known bug in the Watchguard firmware that is causing a lot of trouble. Currently, we still do not know why VPN Tracker is triggering this bug, as the Windows client seems to not trigger it. We talked with Watchguard, but even they could not tell us what we are doing wrong. Basically the tunnel dies internally in the Watchguard (it's still shown as open and established, but traffic arriving over this tunnel is rejected as if the tunnel was closed).
If you are using a Branch Office VPN at the moment, try switching to a MUVPN if possible. MUVPN works with VPN Tracker as well and usually yields for better results.
Please refer to the following description.
VPN Tracker Pro is a great asset if you are a consultant, a system or network administrator, or are working with multiple VPN connections:
- Export VPN connections for yourself and other users.
- Scan the remote network for services or to assist users.
- Connect to multiple VPNs at the same time.
- Manage a large number of VPNs using search, a condensed layout, and connection groups.
- Configure your Mac as a router to provide the entire network with a VPN tunnel using Network to Network connections.
- Download the OpenVPN configuration file from the Unifi console.
- Open the configuration file with a text editor.
- Identify this line:
Cipher AES-256-CBC
- Change the line to:
AES-256-GCM
- Save the file.
- Import the file into VPN Tracker
With the help of this configuration guide, you'll be up and running with your NETGEAR Nighthawk in no time.
Don't want to run all your traffic through the VPN? You can configure the connection to "Host to Network" to only send network-relevant traffic through the VPN.
Once you have selected "Host to network", you can connect and VPN Tracker 365 will automatically set a route to just send data for the network behind your VPN and route all other traffic (i.e. personal traffic) separately through your normal internet connection.
Note, this will give you the same behaviour as unchecking the "use default gateway on remote network" option on Windows.
Current Firmware (Fireware XTM)
WatchGuard Firebox X Edge e-Series devices with Fireware XTM (Fireware 11) are fully supported in current versions of VPN Tracker. For details please see our configuration guide.
Older Firmware
Devices running an older firmware may often work using the following setup. Please note however that we can't guarantee that this setup will work in all cases.
Start by creating a new user on the Firebox Edge and then configure MUVPN support for this user.
In VPN Tracker, use a "Custom Connection" device profile as the basis for your new connection.
Map the WatchGuard settings to your VPN Tracker configuration as shown in the table below:
| Watchguard | VPN Tracker |
|---|---|
| Account Name | Local Identifier |
| Shared Key | Preshared Key |
| Virtual IP Address | Local Address |
| Authentication Algorithm | Phase 1 and Phase 2 Hash/Authentication Algorithms |
| Encryption Algorithm | Phase 1 and Phase 2 Encryption Algorithms |
| Key expiration in hours | Phase 1 and Phase 2 Lifetime |
The following settings are independent of your specific MUVPN configuration:
- Local Identifier Type: Email (even if it is a name and not an email address)
- Exchange Mode: Aggressive
- Phase 1 Diffie-Hellman Group: Group 2 (1024 bit)
- Perfect Forward Secrecy (PFS): off
Finally make sure the that VPN Tracker's "Network" setting is set to "Host to Network", and the correct Remote Network (i.e. the network that you want connect to through the VPN) is used (e.g. 192.168.1.0/255.255.255.0).